
No Bake Chocolate Peanut Butter Pie with Graham Cracker Crust
This is the lightest, fluffiest peanut butter pie you’ll ever put in your mouth, so go ahead and cut yourself a BIG piece! Topped with a luscious dark chocolate ganache, drizzled with honey, and sprinkled with flaky sea salt, it’s a decadent dessert that you’ll be thinking about all week!
This post may contain affiliate links. That means if you click on the link and make a purchase, I will receive an affiliate commission at no extra cost to you. All opinions remain my own. As an Amazon associate, I earn from qualifying purchases.
A couple years ago I finally tried out one of our local restaurants that had been featured on Diners, Drive-ins, and Dives: Glass Onion, only a 10 minute drive from my house. It truly lived up to its hype — all the Southern classics on the menu were perfectly made and it was a wonderful meal.
But it was the dessert, a chocolate peanut butter pie topped with local honey, that made the most lasting impression on me. I was determined to make this pie at home.
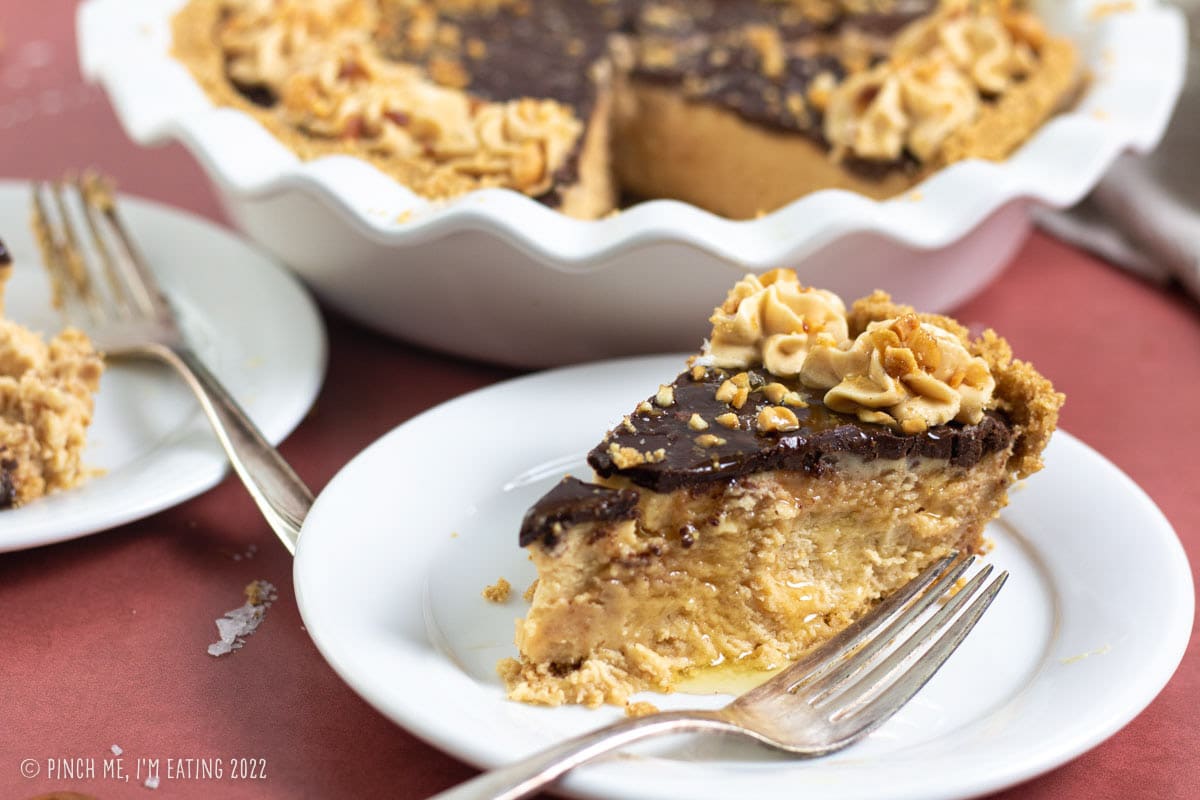
After many trials and errors, I finally nailed it (and dare I say, surpassed it?). The peanut butter filling is light and fluffy, the dark chocolate ganache adds the perfect bittersweet contrast, and the honey drizzle rounds out the dessert. Even family members who don’t normally like peanut butter pie at all love this one. This is truly the best peanut butter pie I’ve ever had.
Go ahead and cut yourself a big slice, because you’ll want it.

Peanut Butter Pie Ingredients & Why to Use Them
Don’t be overwhelmed by the longer ingredient list: most of these are very standard ingredients and each one plays a key part in making this the best peanut butter pie I’ve ever tasted!
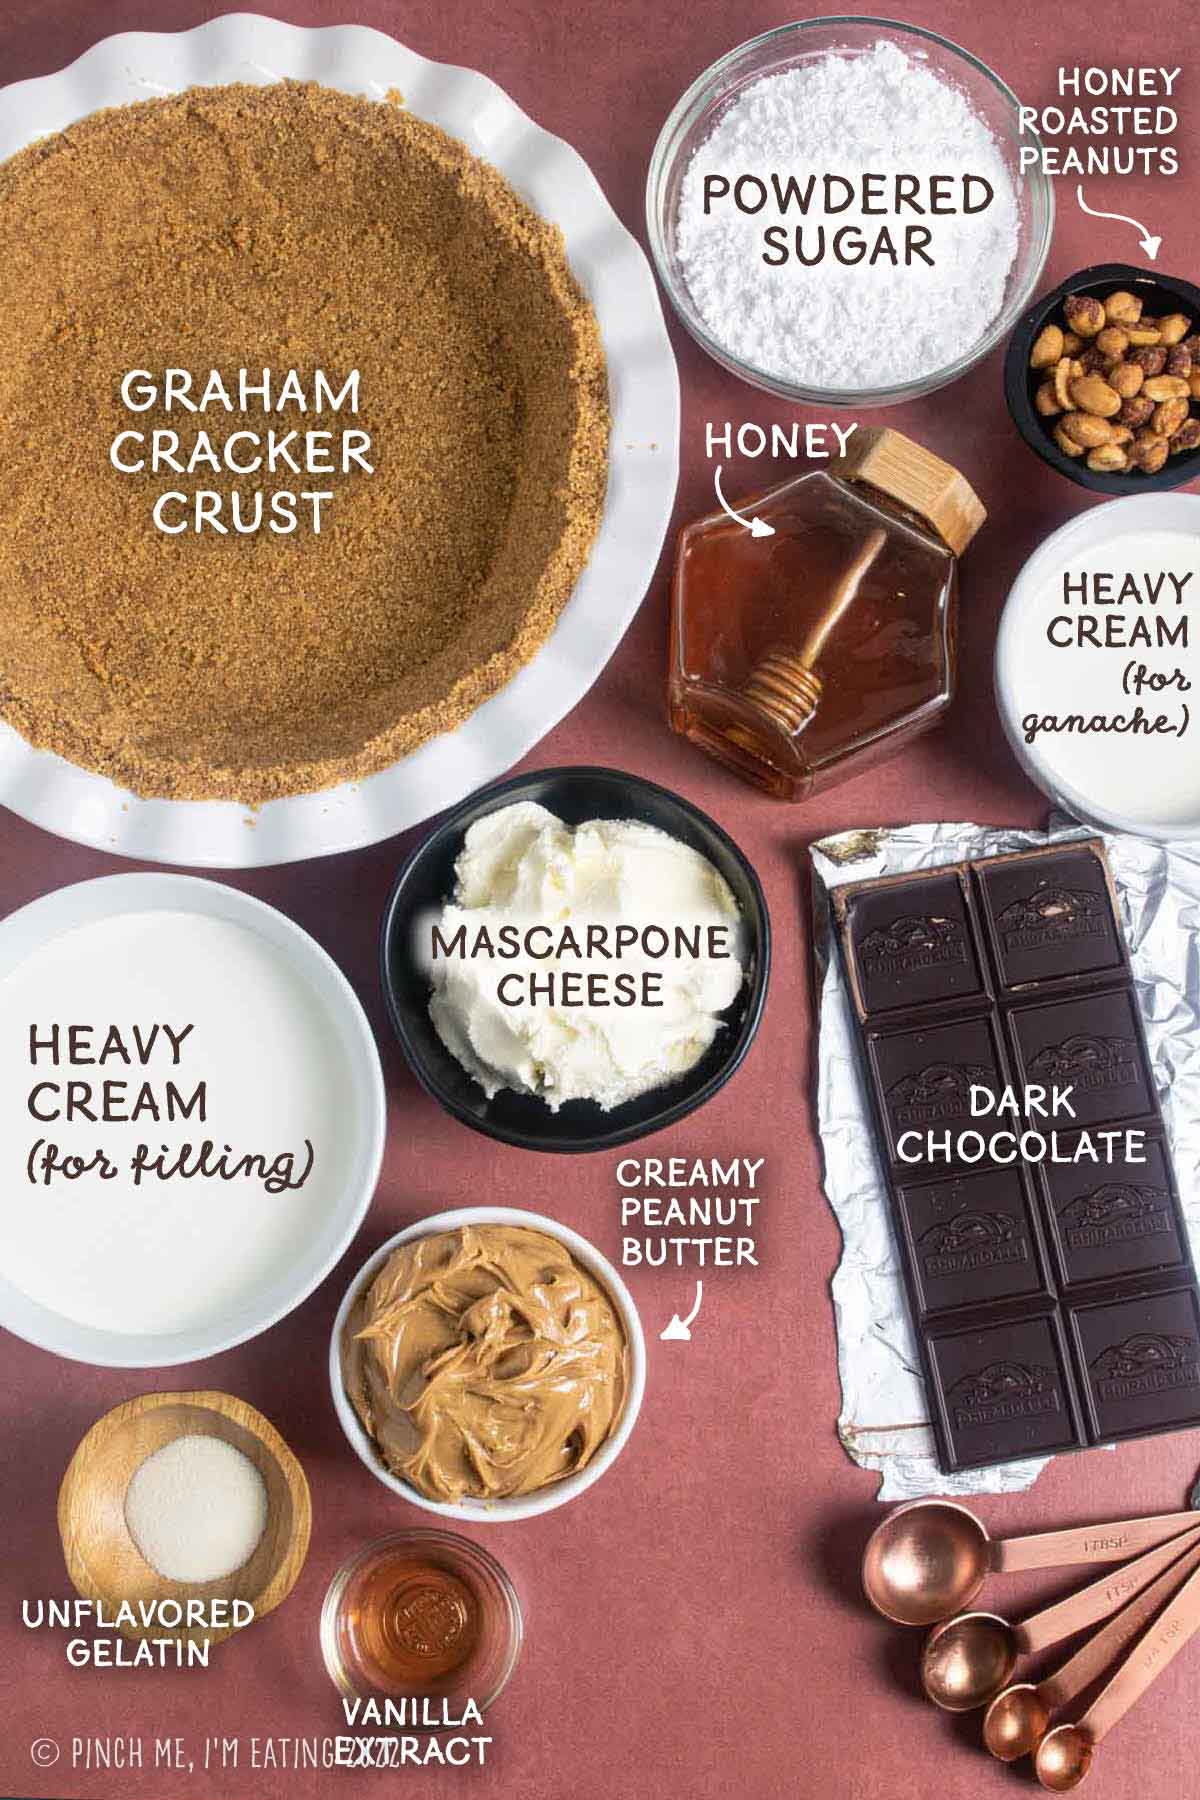
Homemade graham cracker crust
While you can use a store-bought crust for this if you want, there is NOTHING like the taste of a homemade one and they’re so easy to make!
Filling and ganache
Toppings
A little more texture and flavor from peanuts, sea salt, and honey on top makes this an exceptional pie!
Making the pie: Four Main Components
Ingredient measurements and detailed instructions are included in the recipe card at the bottom of the post.
No-bake Graham Cracker Crust
First, you’l make the crust from scratch by combining graham cracker crumbs, sugar, and melted butter in your pie plate. Press it against the bottom and sides of the pie dish with your fingers and a small measuring cup to compress the crust, and chill it in the fridge while you work on the mousse.
Peanut butter mousse
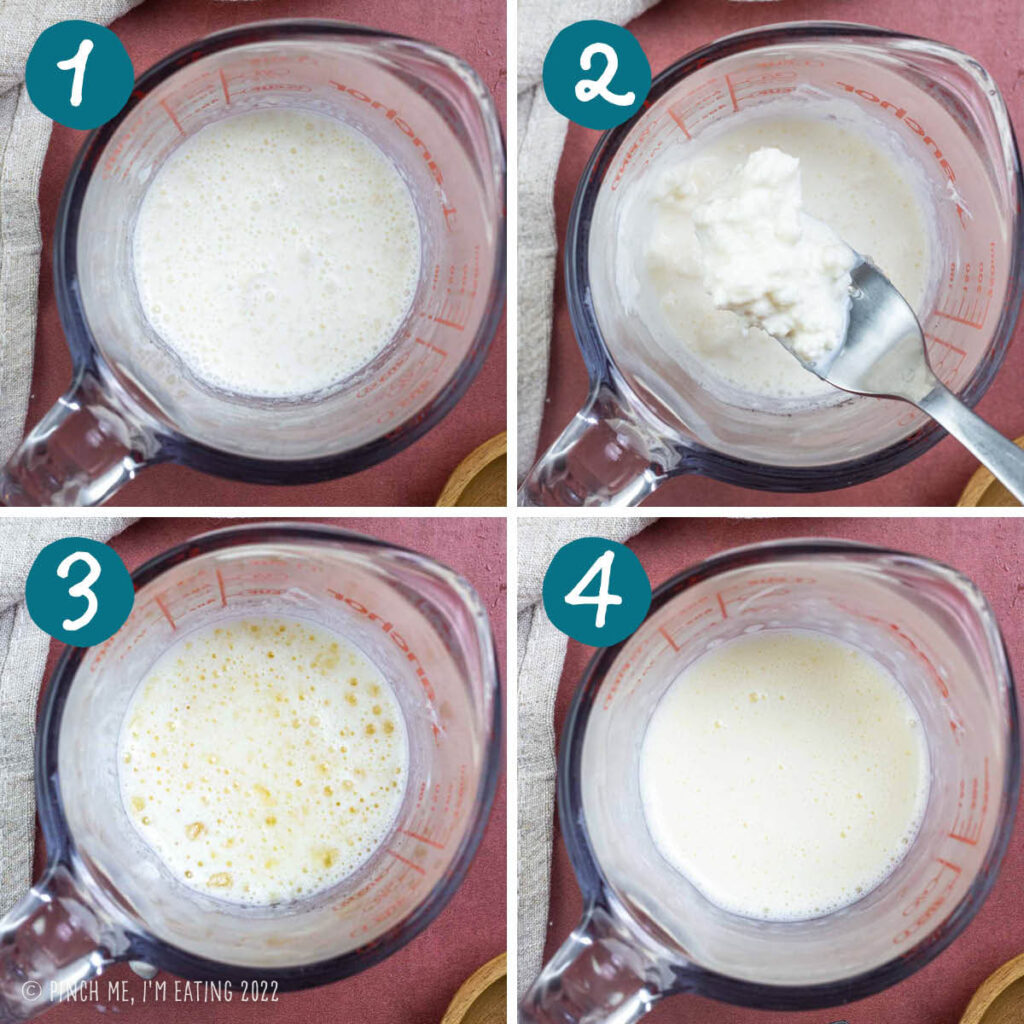
We’ll start by softening some gelatin by whisking it into in a little cream (1). After sitting for 5-10 minutes, the gelatin will have absorbed some of the liquid (2). Heat it in the microwave just until the gelatin melts, 20-30 seconds, (3) and stir until it’s smooth with no more lumps (4).
Meanwhile, mix the mascarpone, powdered sugar, vanilla, and peanut butter until it’s smooth. Then add the melted gelatin.
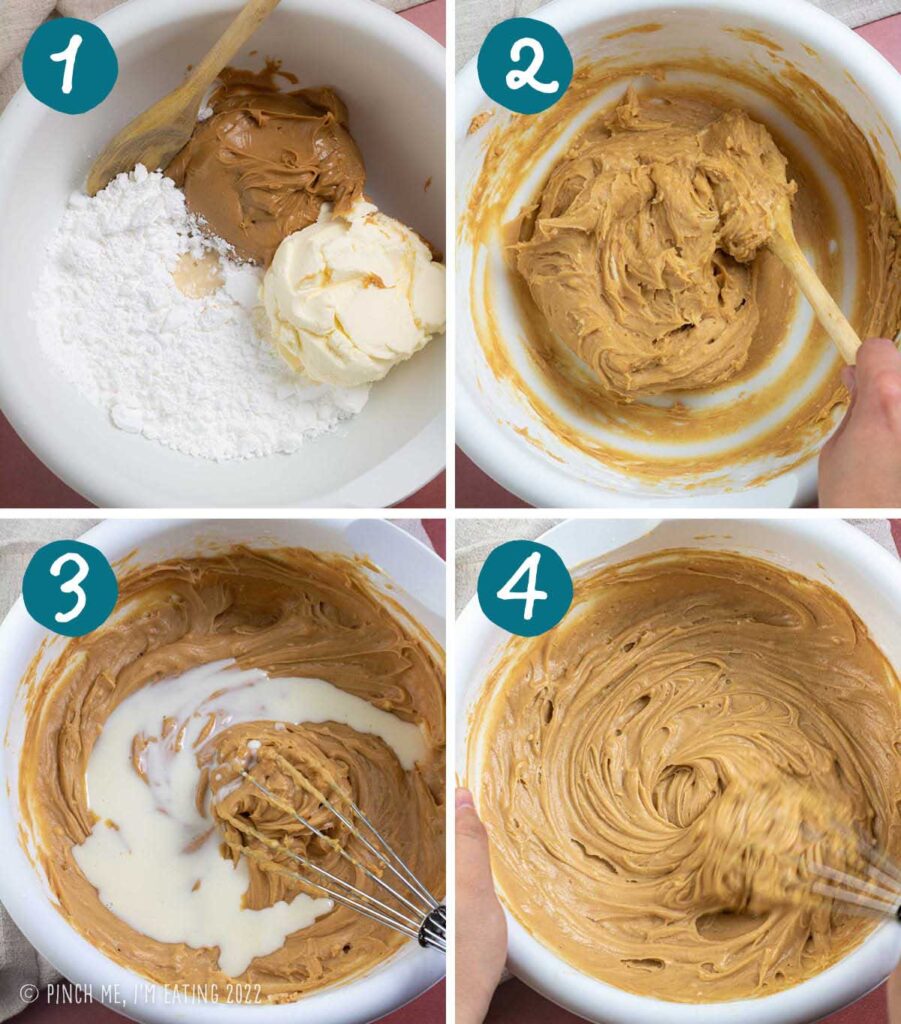
Finally, we’ll whip the heavy cream until it has stiff peaks.

You’ll fold the whipped cream into the peanut butter mixture in three batches so the filling is light and fluffy.
You can stir the first 1/3 of the whipped cream into the peanut butter mixture normally just to lighten the mixture (steps 1 and 2). The second and final 1/3 of the whipped cream need to be folded into the mixture to keep as much air as possible. (steps 3 and 4)

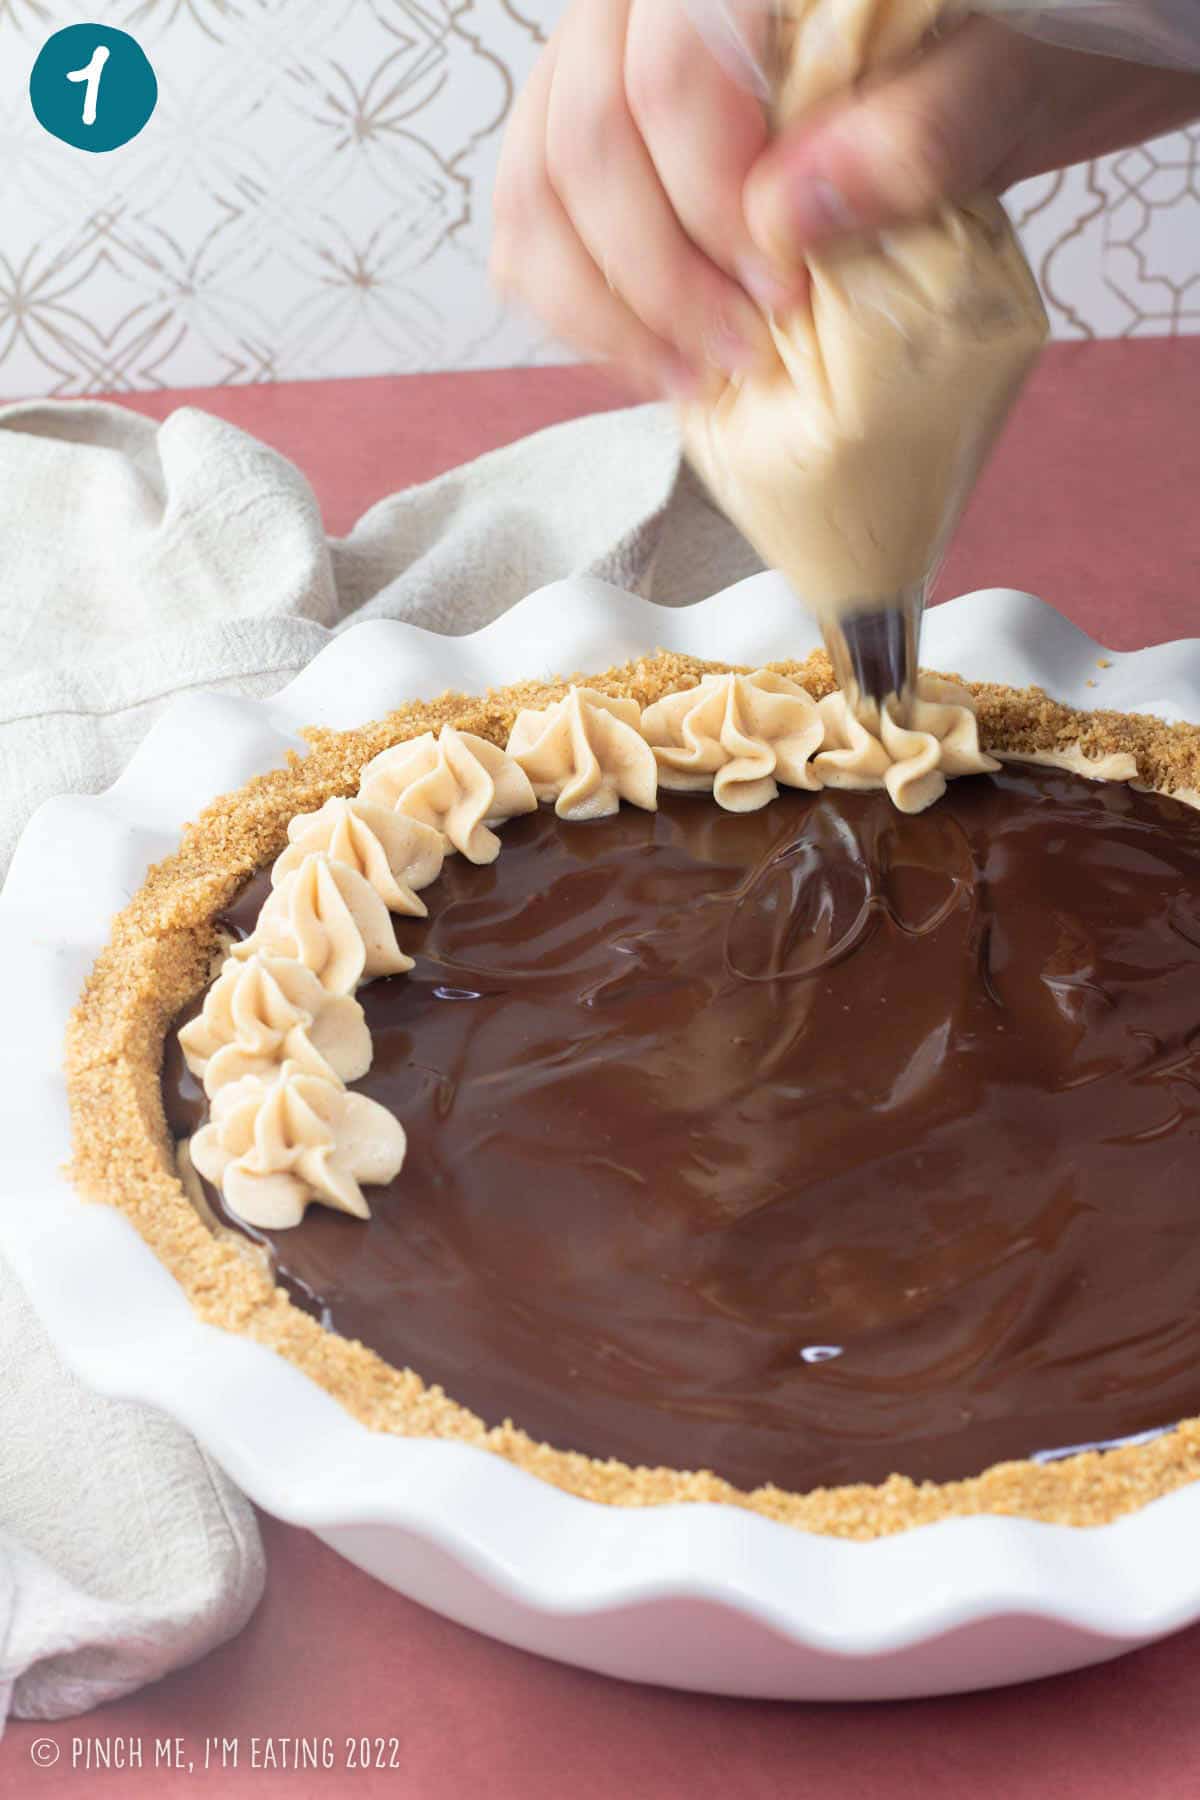
Set a cup of filling aside in a ziplock or piping bag fitted with a star tip for topping the pie, and fill the crust with the remainder of the mousse.

Chocolate ganache
No double boilers here! To make the chocolate ganache, we just heat the cream in the microwave and pour it over the chopped chocolate in a bowl. Let it sit for five minutes before stirring.
Stir until it’s smooth, add the butter, and stir again until it’s incorporated. Pour it over top of the mousse and spread it evenly across the pie.


Toppings
Here’s the fun part! Now you get to decorate and sprinkle to your heart’s content!
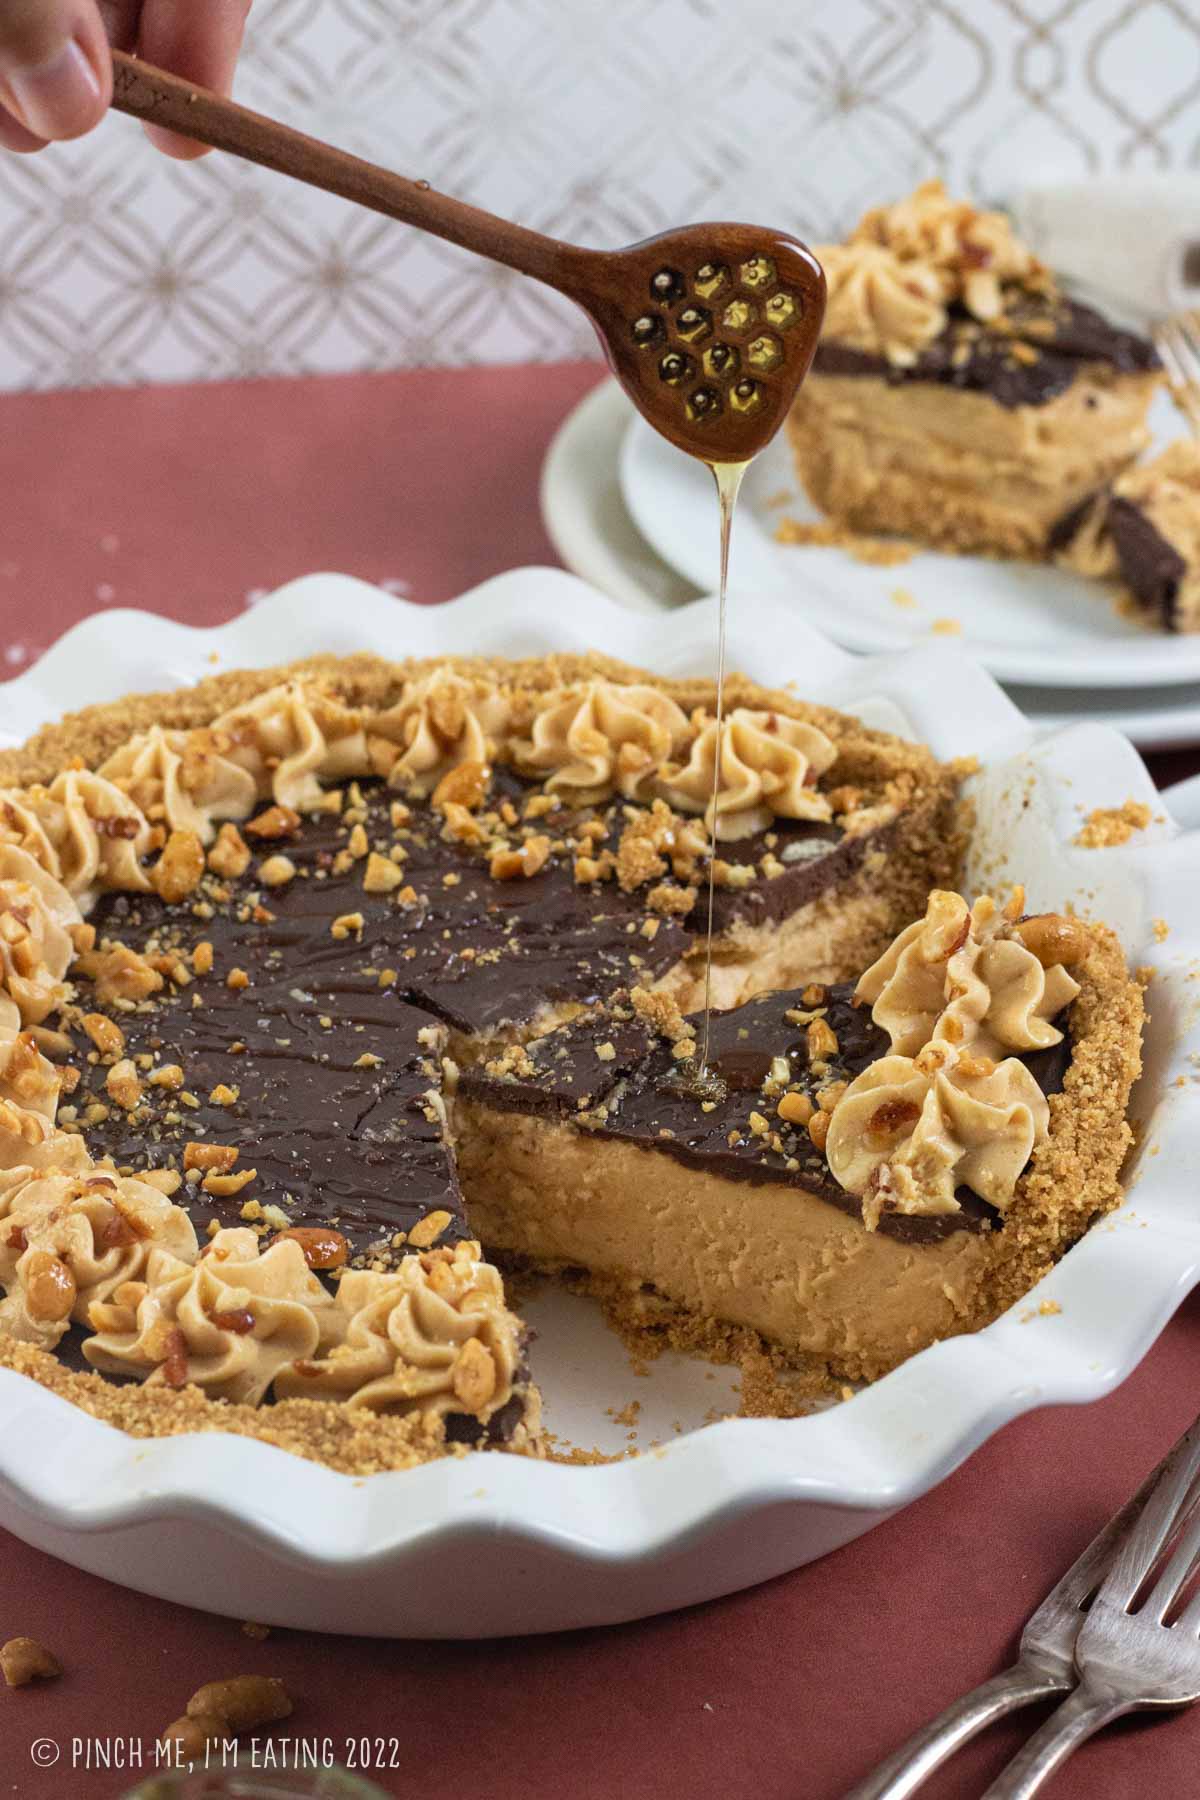
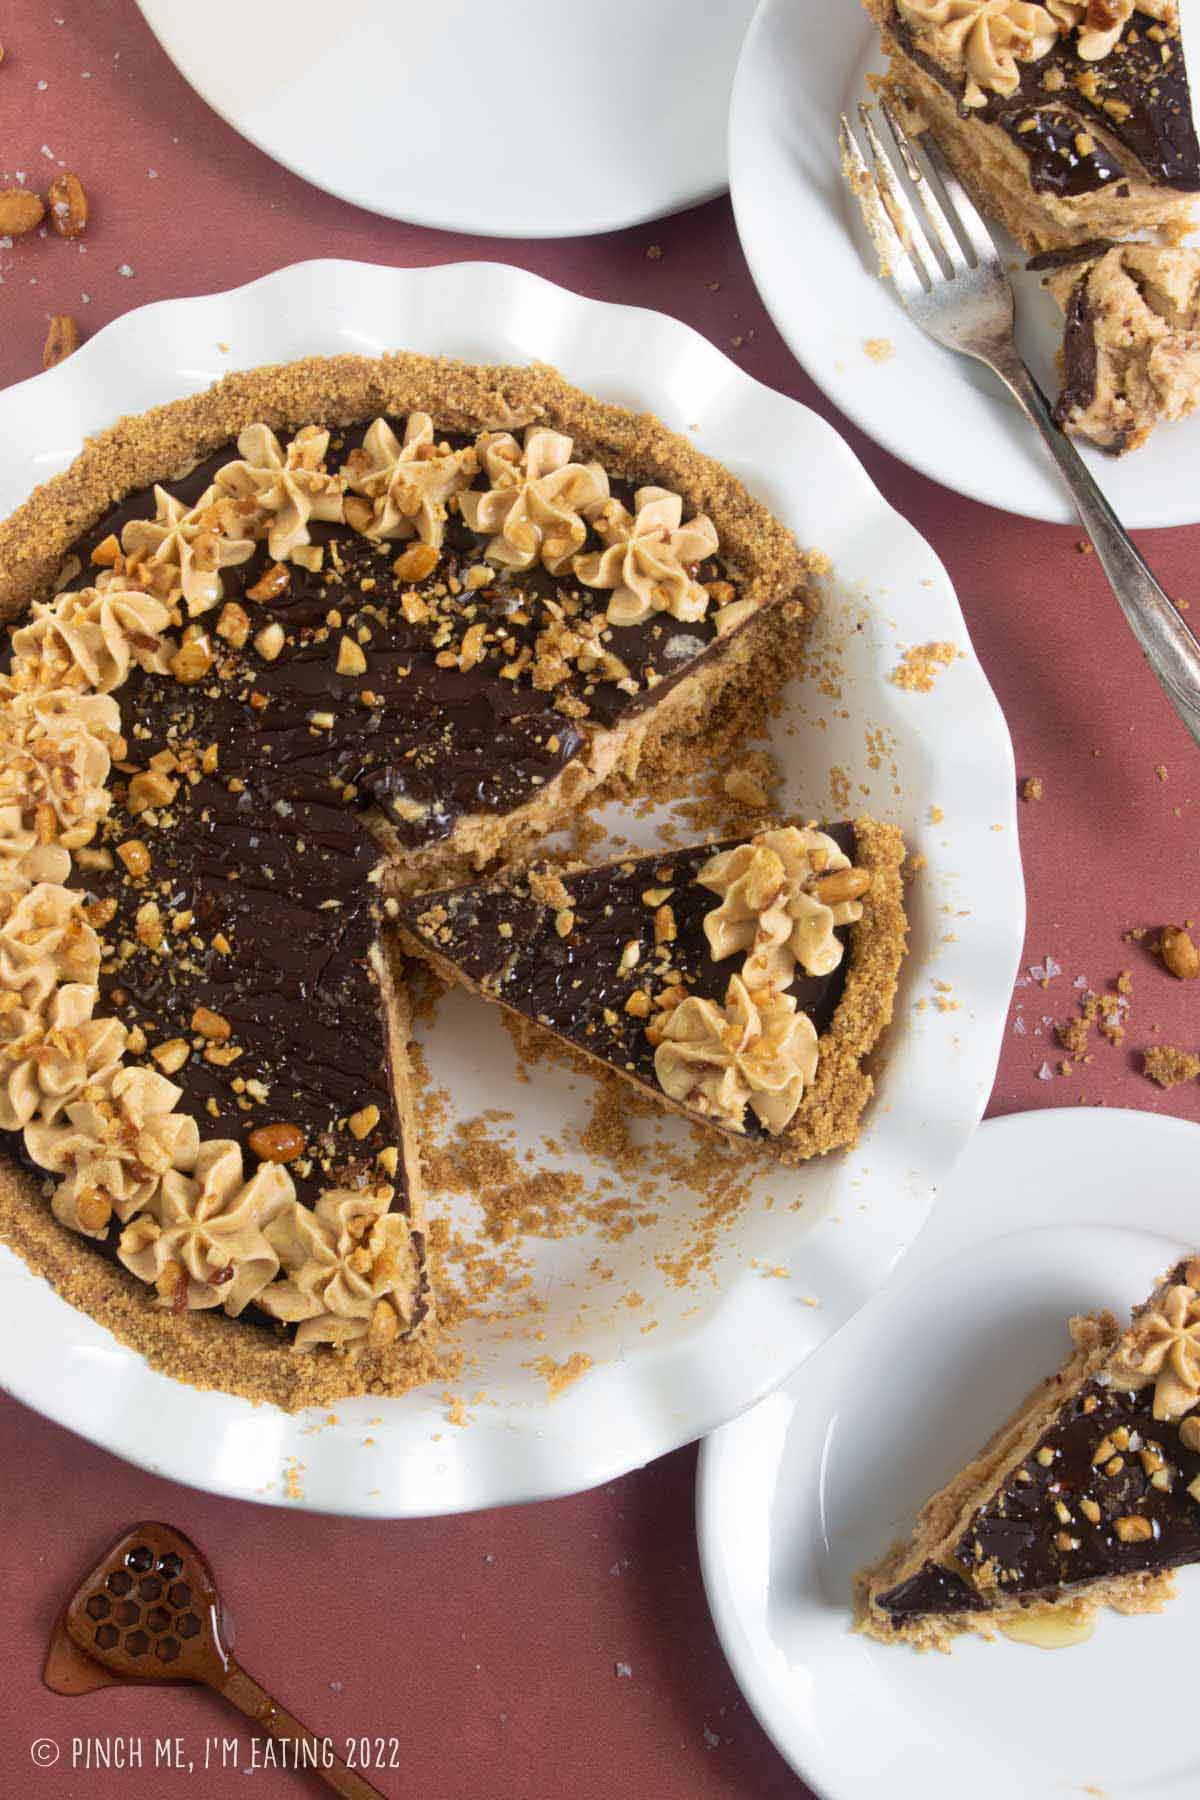
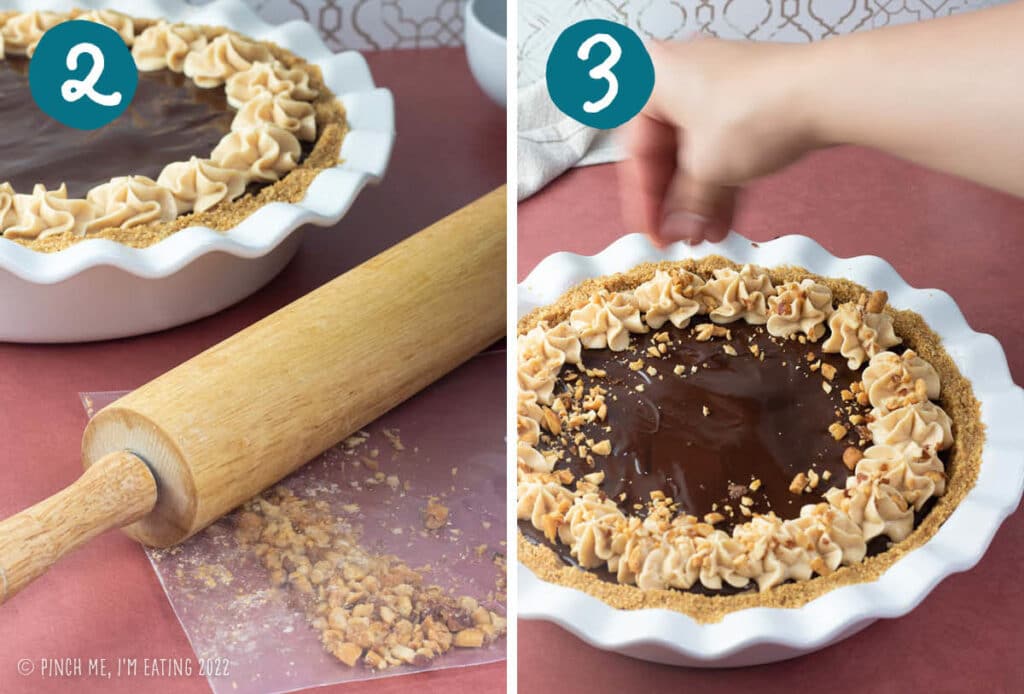
Pipe the reserved peanut butter mousse in little rosettes around the edge of the pie.
Crush some honey roasted peanuts in a ziplock bag with a rolling pin and sprinkle on top of the rosettes. Sprinkle a little flaky sea salt over the ganache and chill to set the mousse and ganache.
Just before serving, drizzle the top with your favorite honey. Don’t skip that part! It’s my absolute favorite!
Expert Tips & Tricks
- Be sure not to overheat the cream when melting the gelatin. Boiling gelatin can render it ineffective and it will no longer set correctly. 20-30 seconds in the microwave with the cream should be sufficient, but if in doubt start at 20 seconds, stir, and if there are still lumps heat again in 10 second intervals.
- Don’t add the honey until just before serving, or it will just absorb into the ganache. It will still taste great, but won’t have that pretty look!
- If your ganache starts to separate and look greasy, you can often bring it back together by whisking in another splash of cream.
More Dessert Recipes You’ll Love


Be sure to FOLLOW ME on FACEBOOK, PINTEREST, INSTAGRAM, and TWITTER for more great recipe ideas! Or SIGN UP for my EMAIL NEWSLETTER to get updates and recipes straight to your inbox!

No Bake Chocolate Peanut Butter Pie with Graham Cracker Crust
Ingredients
For the graham cracker crust
- 10 honey graham crackers or about 1 1/4 cup graham cracker crumbs
- 6 tablespoons salted butter
- 1/4 cup granulated sugar
For the peanut butter mousse
- 1 teaspoon unflavored gelatin
- 1 1/2 cups heavy cream divided
- 1 cup creamy peanut butter see note
- 1 cup confectioners sugar
- 1 teaspoon vanilla extract
- 8 oz mascarpone cheese
For the chocolate ganache
- 3.5 oz dark chocolate I use 72% Ghirardelli
- 1/2 cup heavy cream
- 1 tablespoon butter
For the topping
- 2-3 tablespoons honey roasted peanuts
- 1 pinch flaky sea salt
- 2 tablespoons honey
Instructions
For the graham cracker crust
- Break up graham crackers into the bowl of a food processor and process until you have fine crumbs with no chunks. Melt butter in the microwave.
- Add graham cracker crumbs, melted butter, and sugar to a pie plate and mix with a fork until evenly combined. Tamp down firmly around the bottom and edges of the pie plate using your fingers and something hard like the back of a small measuring cup. Refrigerate while preparing the rest of the recipe.
For the peanut butter mousse
- Sprinkle 1/4 cup cold cream with gelatin and whisk in with a fork. Allow 5 minutes for gelatin to bloom. Heat the cream in the microwave to melt the gelatin, but do not boil. This will take about 20-40 seconds. Start at 20 seconds and stir. If there are still lumps of unmelted gelatin, heat again in 10 second intervals until gelatin is completely melted.
- While gelatin is softening, add peanut butter, mascarpone, vanilla, and sugar to a large bowl and mix until smooth.
- Add the gelatin-and-cream mixture to peanut butter mixture, stir until smooth, and set aside.
- Whip remaining 1 and 1/4 cups cream to stiff peaks. Stir a scoop of whipped cream (about 1/3 of the total) into peanut butter mixture to lighten it. Fold the remaining whipped cream into the peanut butter mixture in two more batches, keeping as much air in as possible.
- Set aside 1 cup of peanut butter mousse in a piping bag or ziplock bag fitted with a star tip. Spread the remaining filling into graham cracker crust.
For the dark chocolate ganache
- Chop chocolate and add to a medium bowl.
- Heat cream for about a minute in the microwave or until hot. Pour the hot cream over the chocolate and let it sit for 5 minutes. Then stir until smooth. Add in the butter and whisk until it's incorporated.
- Pour the ganache over top of pie and smooth with a spatula, making sure to cover the whole top evenly and to the edges.
Toppings
- Pipe remaining mousse in rosettes around the edge of the pie.
- Put honey roasted peanuts inside a ziplock bag and roll with a rolling pin until crushed. You can also use a meat tenderizer but it may puncture the bag. Sprinkle mousse rosettes with honey roasted peanuts and sprinkle ganache with a pinch of flaky sea salt. Chill pie for 2 hours.
- Drizzle top of pie with honey just before serving. Enjoy!
- Store in the refrigerator for up to 5 days.


Whether it’s for a special occasion or just a treat-yourself moment, this pie is sure to be a crowd-pleaser. Excuse me while I grab my apron and rush to the store to stock up on ingredients – I’ve got some serious baking (and indulging) to do!
Thank you so much for this recipe!!!!! It was easy to make and tastes amazing.
Wow, this recipe looks divine! I love the combination of chocolate and peanut butter.
This recipe is amazing! I made this yesterday for our Thanksgiving meal, and it was a huge hit! I have a feeling it will be requested more, and I’ve been asked to share the recipe. Always excited to share your recipes with others!