
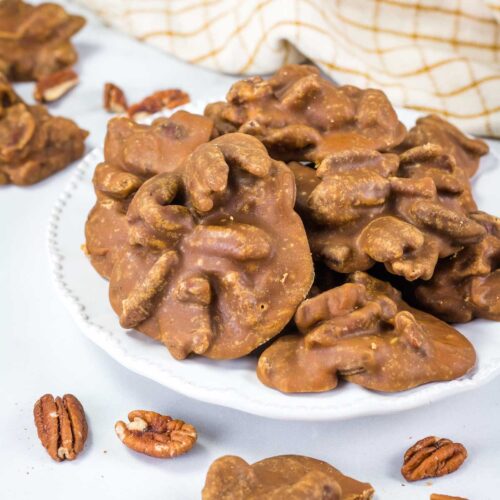
Southern Pecan Pralines (Traditional Praline Recipe)
Old fashioned Southern pecan pralines are pecan clusters coated in a buttery candy with a caramel-like flavor. This traditional praline recipe is a small-scale version of the classic pecan candy recipe they make at the candy stores downtown Charleston, SC, Savannah, GA, and New Orleans!
This easy praline recipe is made with five simple ingredients in under 30 minutes. They’re perfect for shipping to friends and family and make great homemade gifts for the holiday season!
This detailed tutorial is perfect for first-time and experienced candymakers alike. In my video and step-by-step photos, I show you how to visually identify the correct time to take your praline mixture off the heat, even if you don’t have a candy thermometer.
This post may contain affiliate links. That means if you click on the link and make a purchase, I will receive an affiliate commission at no extra cost to you. All opinions remain my own. As an Amazon associate, I earn from qualifying purchases.
If you’ve ever walked past a candy shop in Charleston or Savannah, you’ve likely experienced the delicious aroma of hot pecan pralines. The enticing smell attracts both tourists and locals, tempting them to enter the shop for a free sample.
I, personally, can never resist.
Inside the store, you’ll see a giant copper pot of bubbling caramel-colored candy and rows of freshly-made pralines lined up on a slab of marble. These Southern pecan pralines are a must-buy item to take back home after visiting Charleston (along with some benne wafers and a bottle of Carolina Gold bbq sauce!)
Ah, but what are you to do when the pralines are gone?
Make your own, I say.
There are a lot of different recipes out there for Southern pecan pralines. But I’m confident this is the best one on the internet. Call me cocky, but I’ve got credentials!
Why you should make my recipe
Here’s why I’m uniquely qualified to help you make the absolute BEST pecan pralines.
What Readers Say:
“This is an excellent tutorial with detailed and step-by-step photos. I could almost smell the inside of River Street Sweets in Savannah from memory!”
Paula
What makes a perfect pecan praline?
This southern pecan praline recipe is based on the pralines from Market Street Sweets in Charleston, SC, and River Street Sweets in Savannah, GA. I view those to be the ideal pralines and have created this recipe to be as close to those as possible!
Appearance
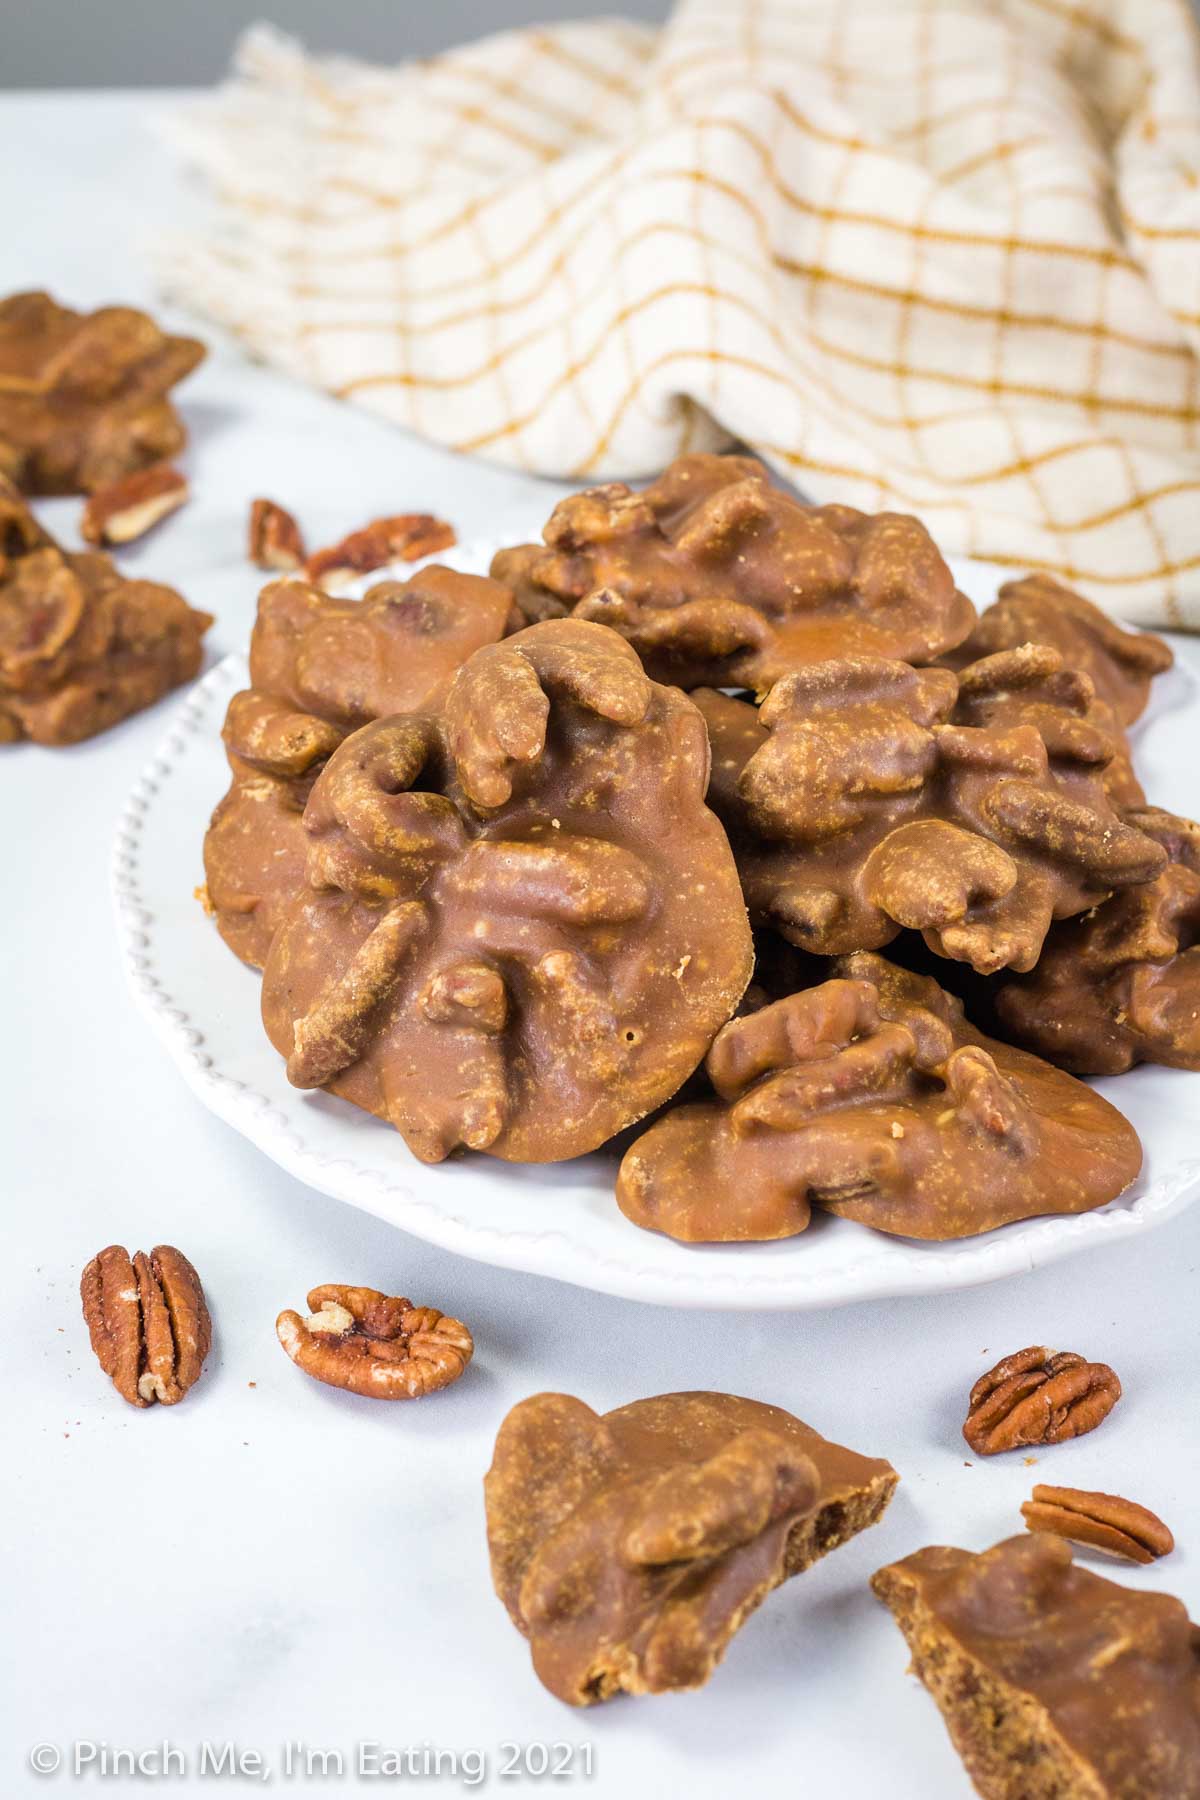
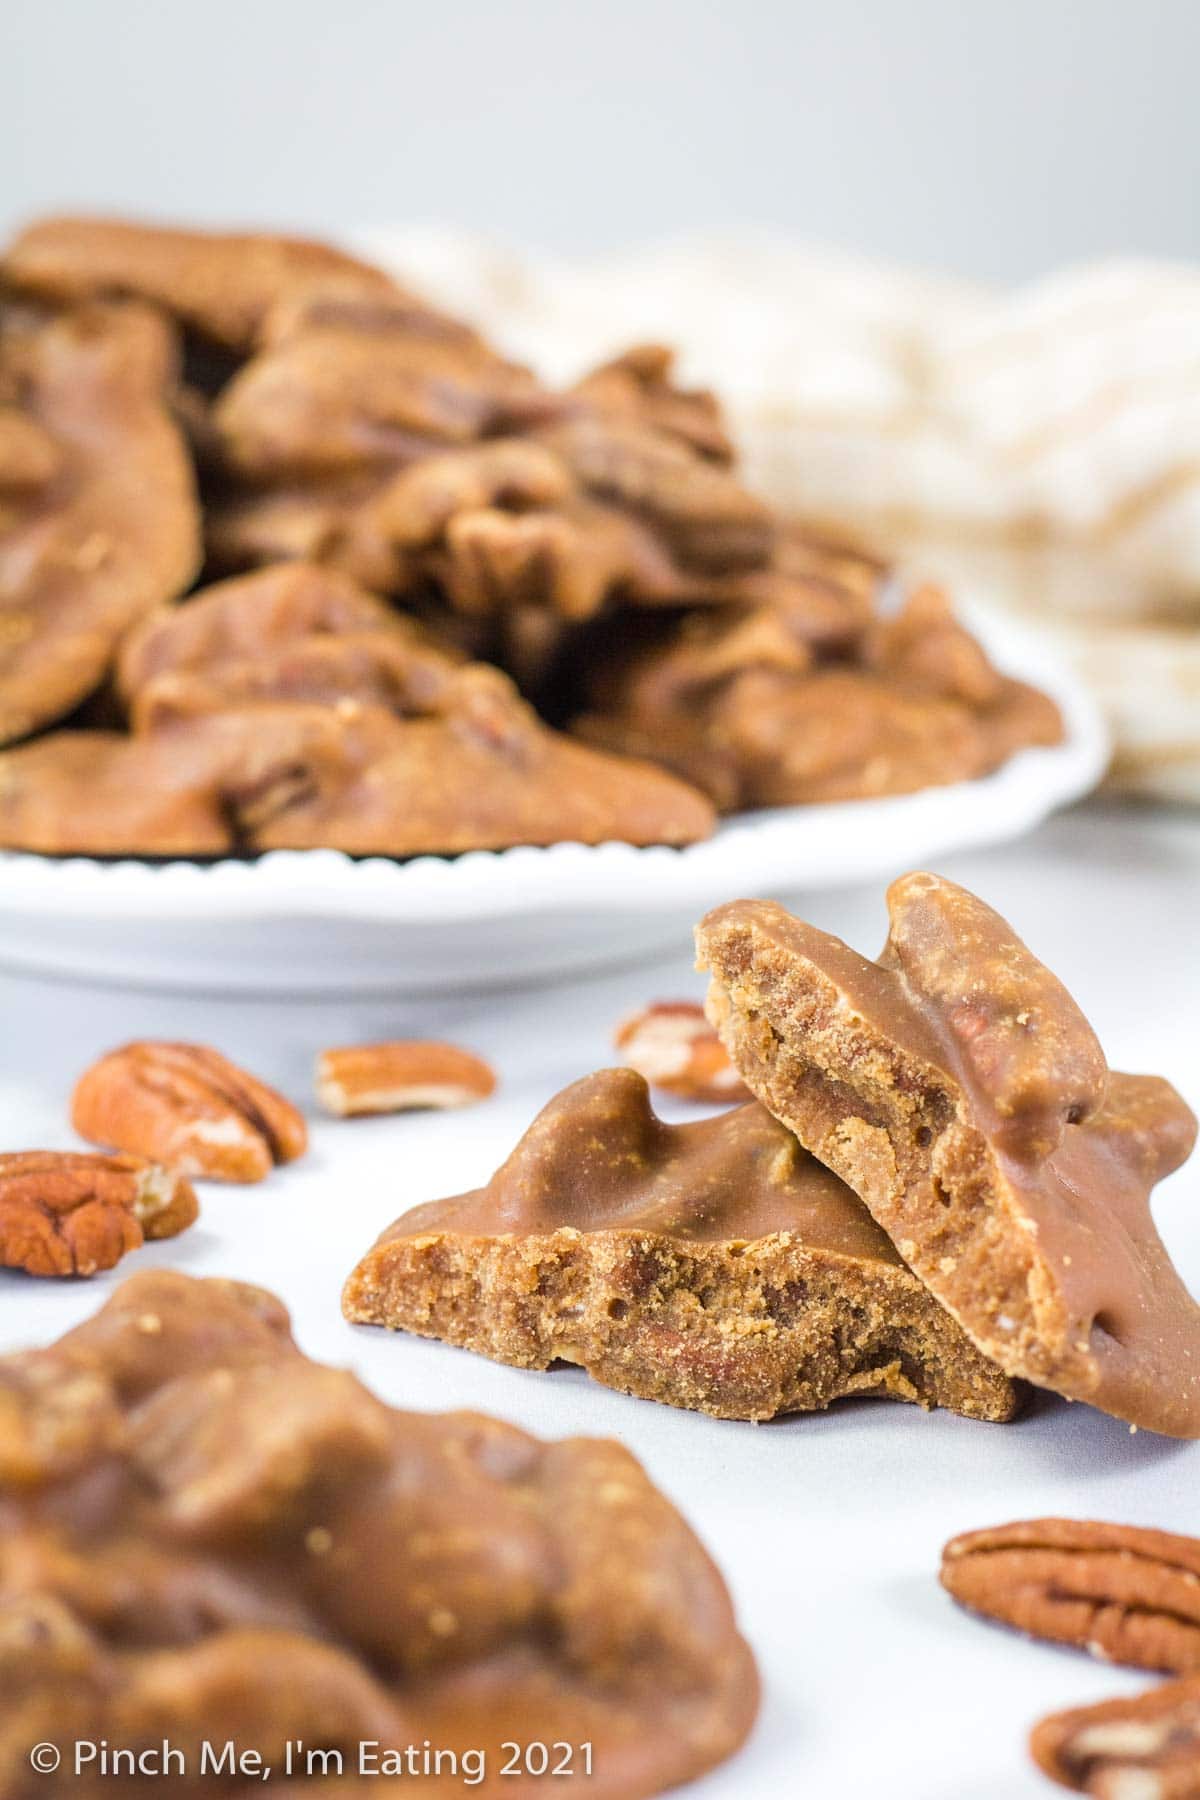
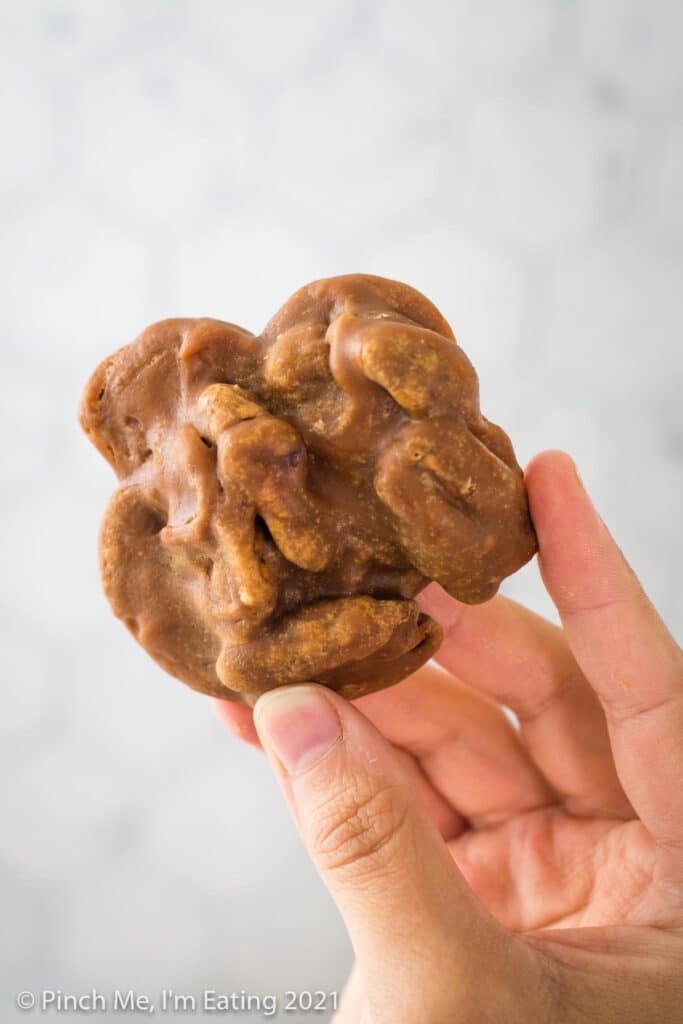
Southern pralines are thick, cookie-sized clusters of pecans bound by medium caramel-colored candy. They will be glossy when they first harden but will develop dull, chalky areas on the surface over time. That’s normal and will not affect the taste.
Taste
Praline candy has a nutty, buttery flavor resembling a cross between caramel and fudge. Toasting your pecans beforehand is optional but will give your pralines a deeper pecan flavor.
Texture
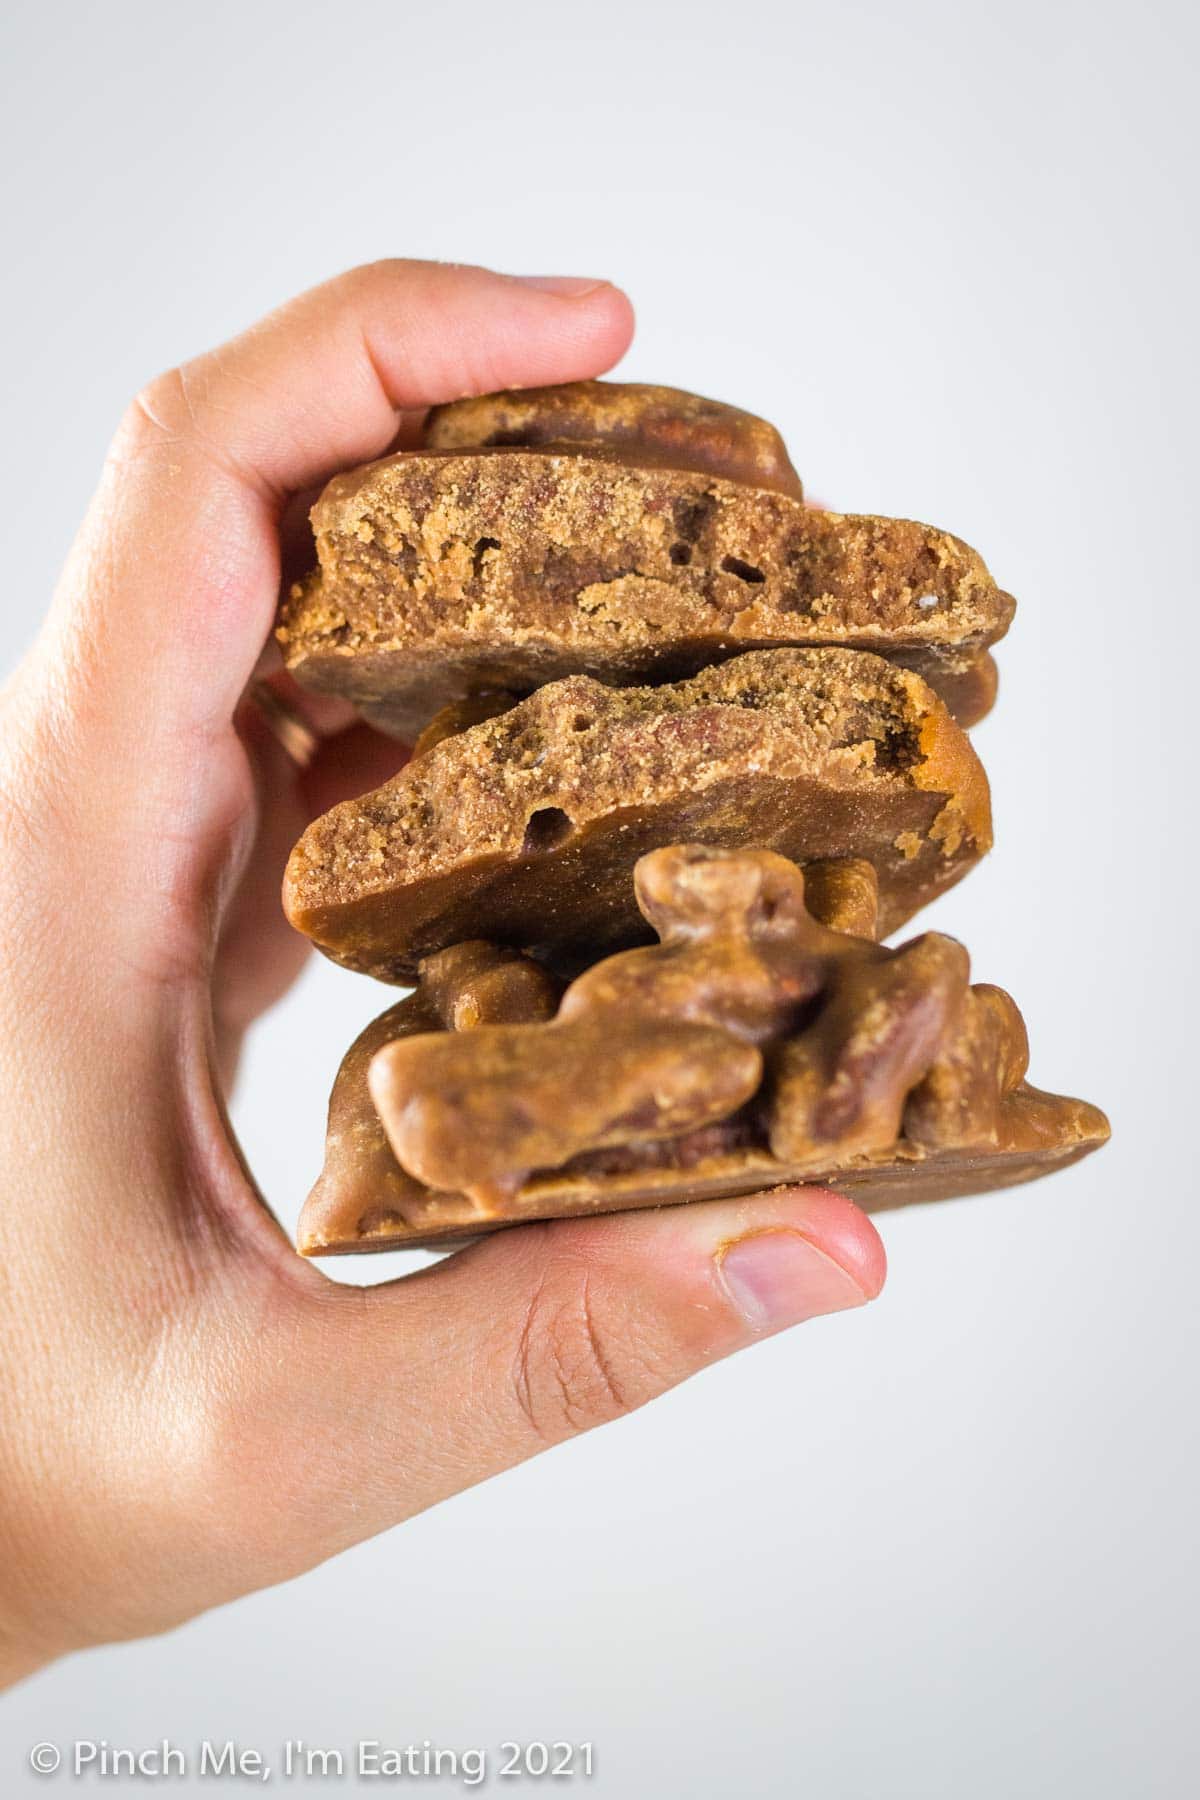
Southern pecan pralines from the candy shops in Charleston and Savannah have a uniquely crisp texture that melts in your mouth. They are light, airy, and creamy, and are firm enough to snap without bending when you break them.
Ingredients
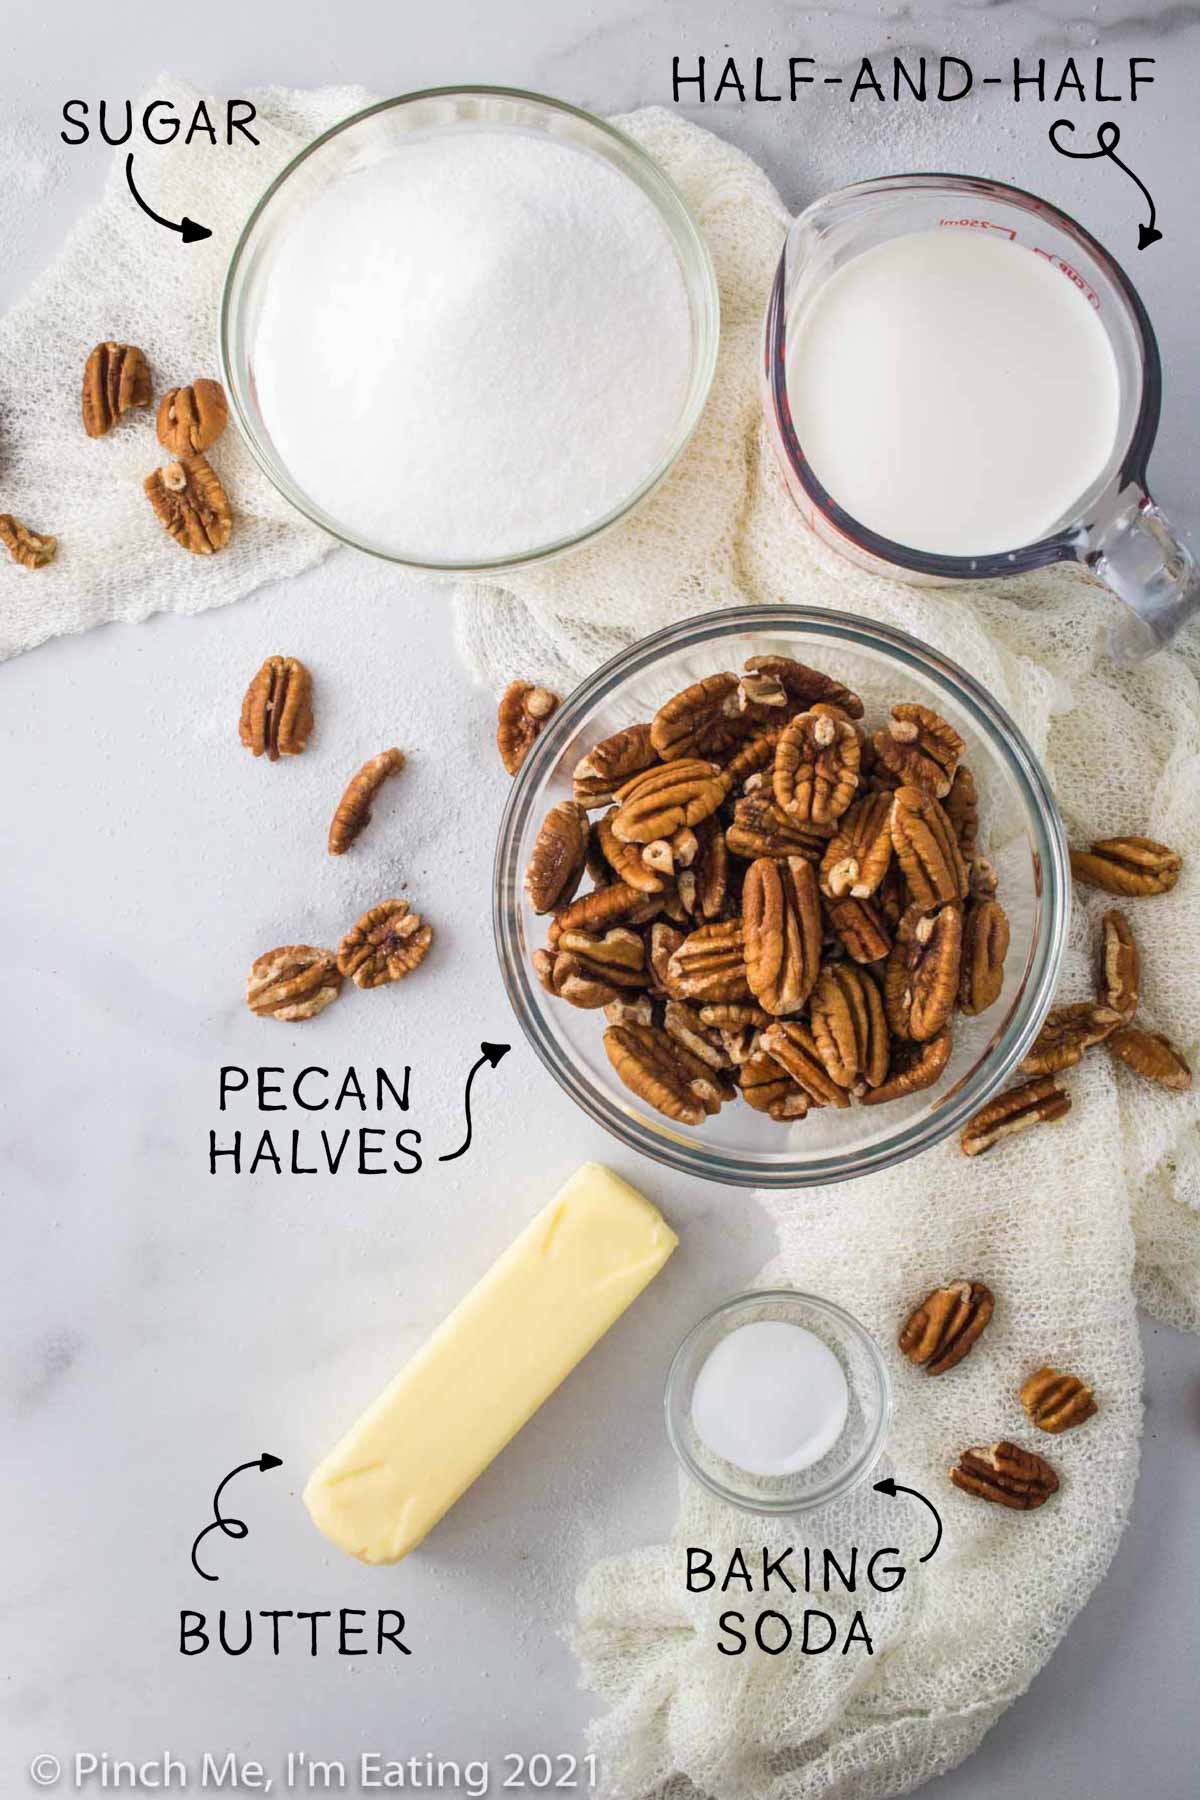
The ingredients in Southern pecan pralines are surprisingly simple. It’s just butter, sugar, half-and-half, baking soda, and pecan halves. That’s it!
Equipment you need
Be sure to have all your equipment ready before you start! This is a fast-moving concoction, so you won’t be able to spend time hunting for a measuring scoop mid-recipe.

How to Make Homemade Southern Pecan Pralines
If this is your first time making homemade candy, these easy pecan pralines are a great place to start!
Summary
The basics of how to make pecan pralines couldn’t be more simple.
- Add butter, half-and-half, sugar, and baking soda to a large pot.
- Heat mixture to 250 degrees, stirring occasionally, and remove from heat.
- Add pecans, stir to combine, and cool for a minute until thickened.
- Use a cookie scoop or measuring cup to scoop pralines onto parchment paper.
- Let pralines cool at room temperature.
That’s it! Anyone can do that.
Step 2 is where it can get a little tricky, because you have to know what to look for and be vigilant about watching your pot.
Before you start cooking, review the photos below. You will want to familiarize yourself with what to expect as you heat up your mixture because once it starts boiling, things move pretty fast.
Step by step photos
Here’s what you’ll see as you heat up your sugar mixture.
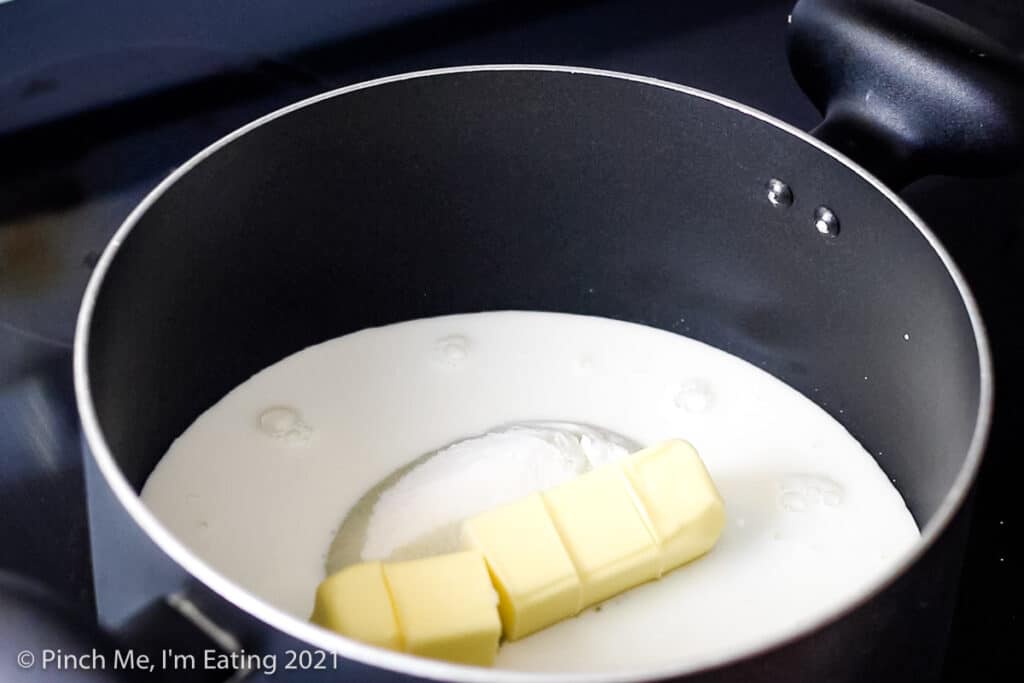
Room temperature: Butter, sugar, half-and-half, and baking soda are in your pot. As you start to heat it up over medium high heat, the butter will melt, the sugar will dissolve, and everything will combine as you stir.
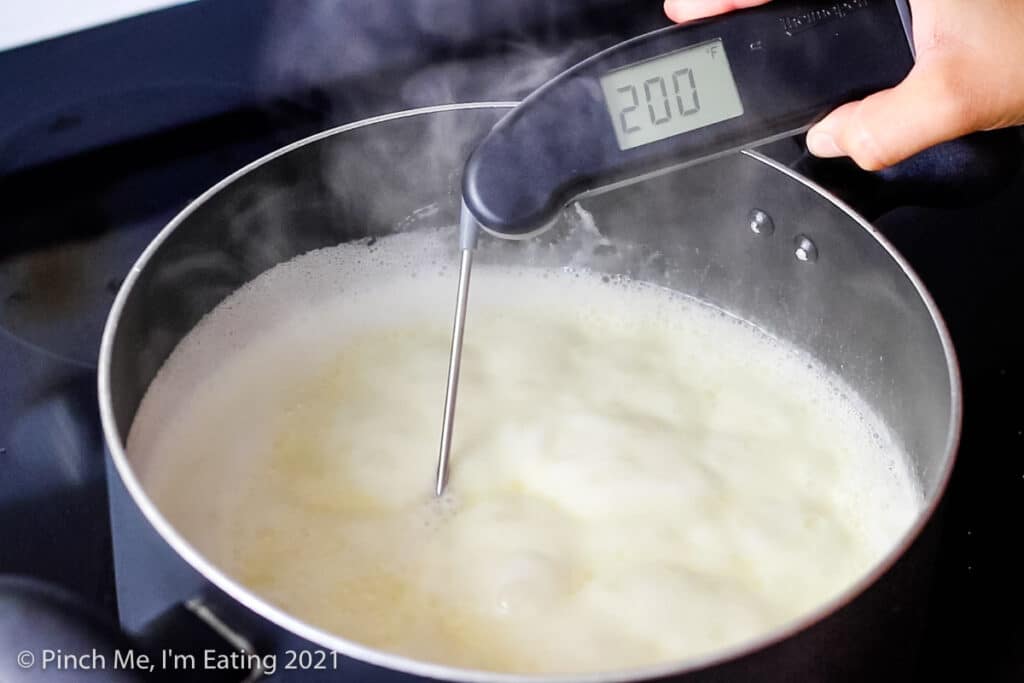
200 degrees: As you hit about 200 degrees Fahrenheit, your mixture will start foaming. Then it will start foaming A LOT and boiling with big bubbles bursting through the foam.
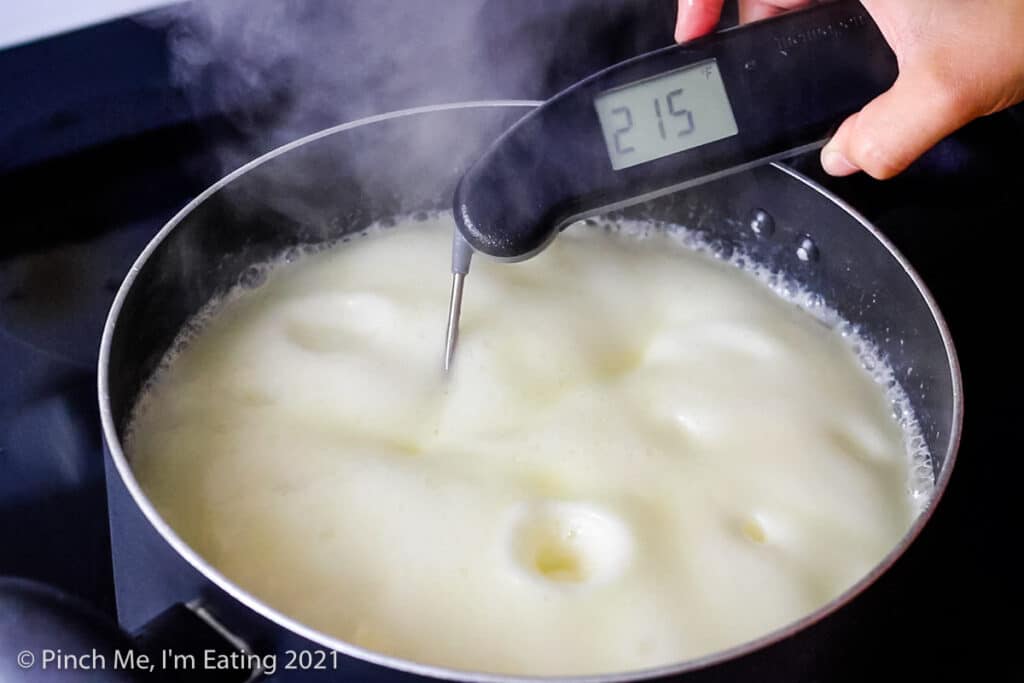
215 degrees: You’ll get to peak size and foaminess. It will be about quadrupled in size and is kind of fun to watch!
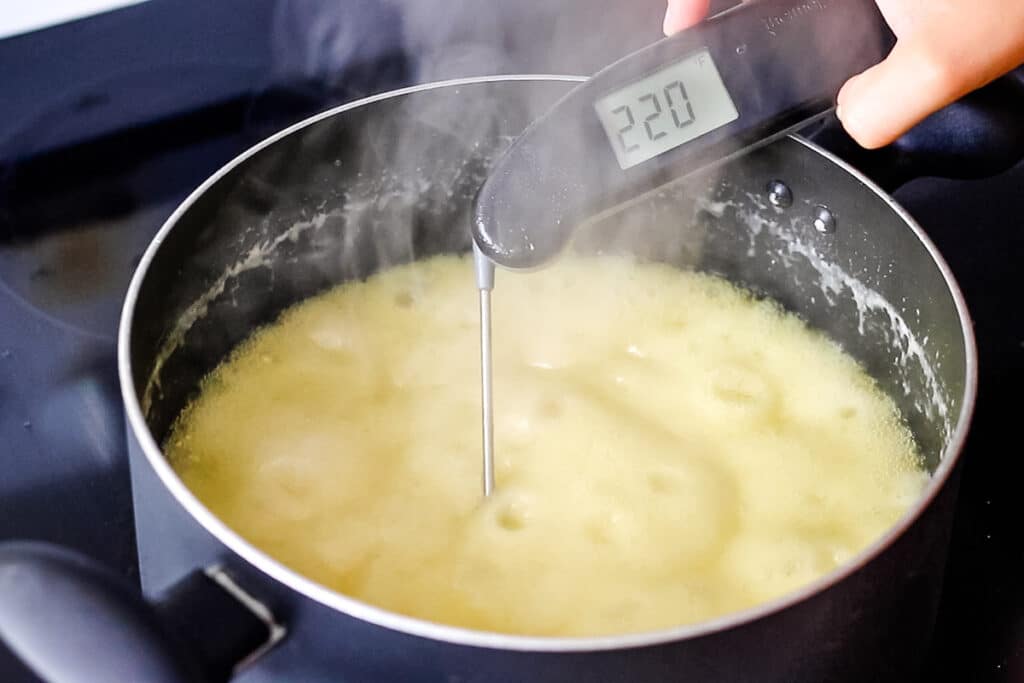
220 degrees: After the first big rolling foamy boil, the mixture settles back down to a normal size again. It begins to take on some color at this point.
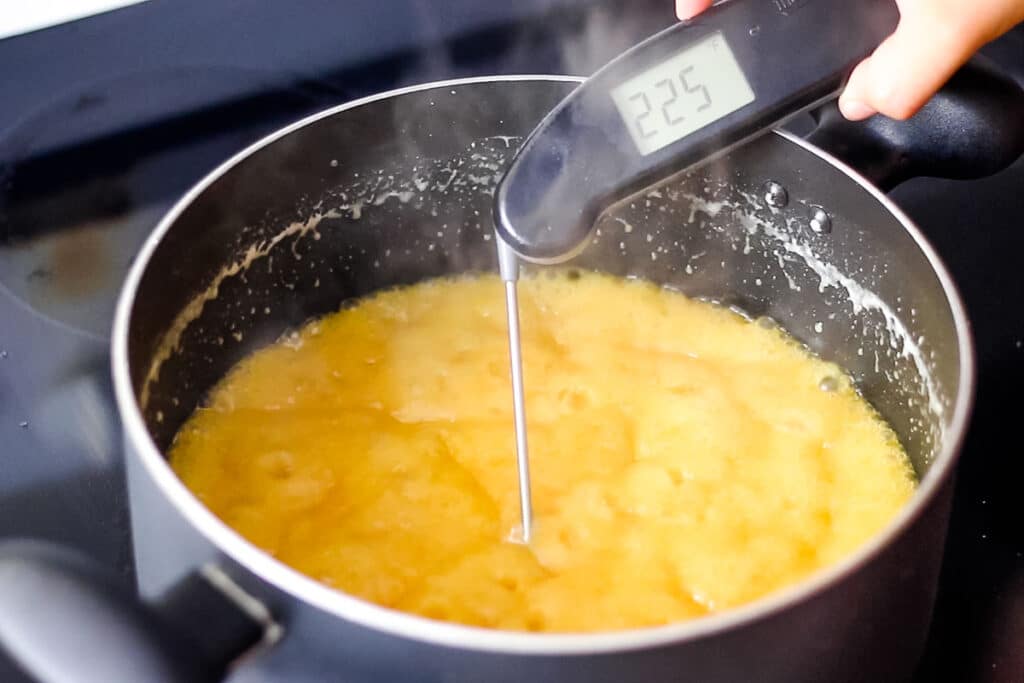
225 to 230 degrees: It’s starting to get nicely golden. If you stop stirring for a moment, you’ll see little foamy bubbling hills with darker lines between. If you stir quickly, you will see the bottom of the pot for just a split second following your spoon.
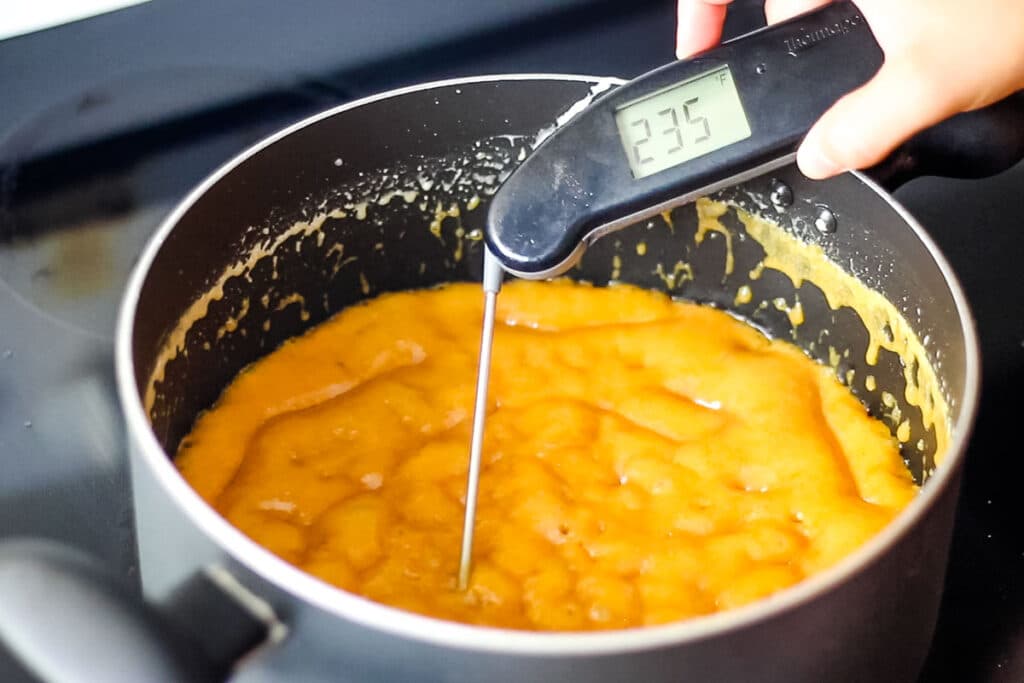
235 degrees (soft ball stage): Notice at 235 degrees, the mixture is still a bit puffy, and you’ll see darker lines throughout the pot. It’ll be about 30 seconds to a minute longer before it’s ready.
Traditional candy-making literature says pralines are made at 235 to 240 degrees, or soft ball stage. I found that removing the mixture at soft-ball stage resulted in a praline that was chewy, not crisp like the ones we’re trying to replicate here.
You can see my photo of a praline cooked to soft-ball stage in the troubleshooting section and a demonstration of breaking one in half in my video.
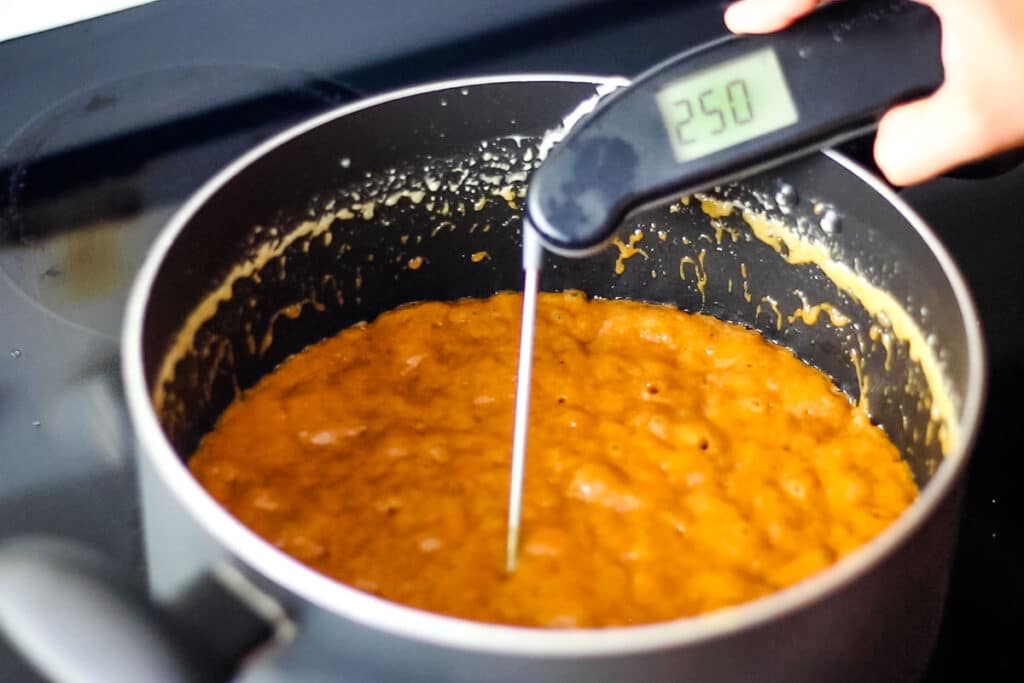
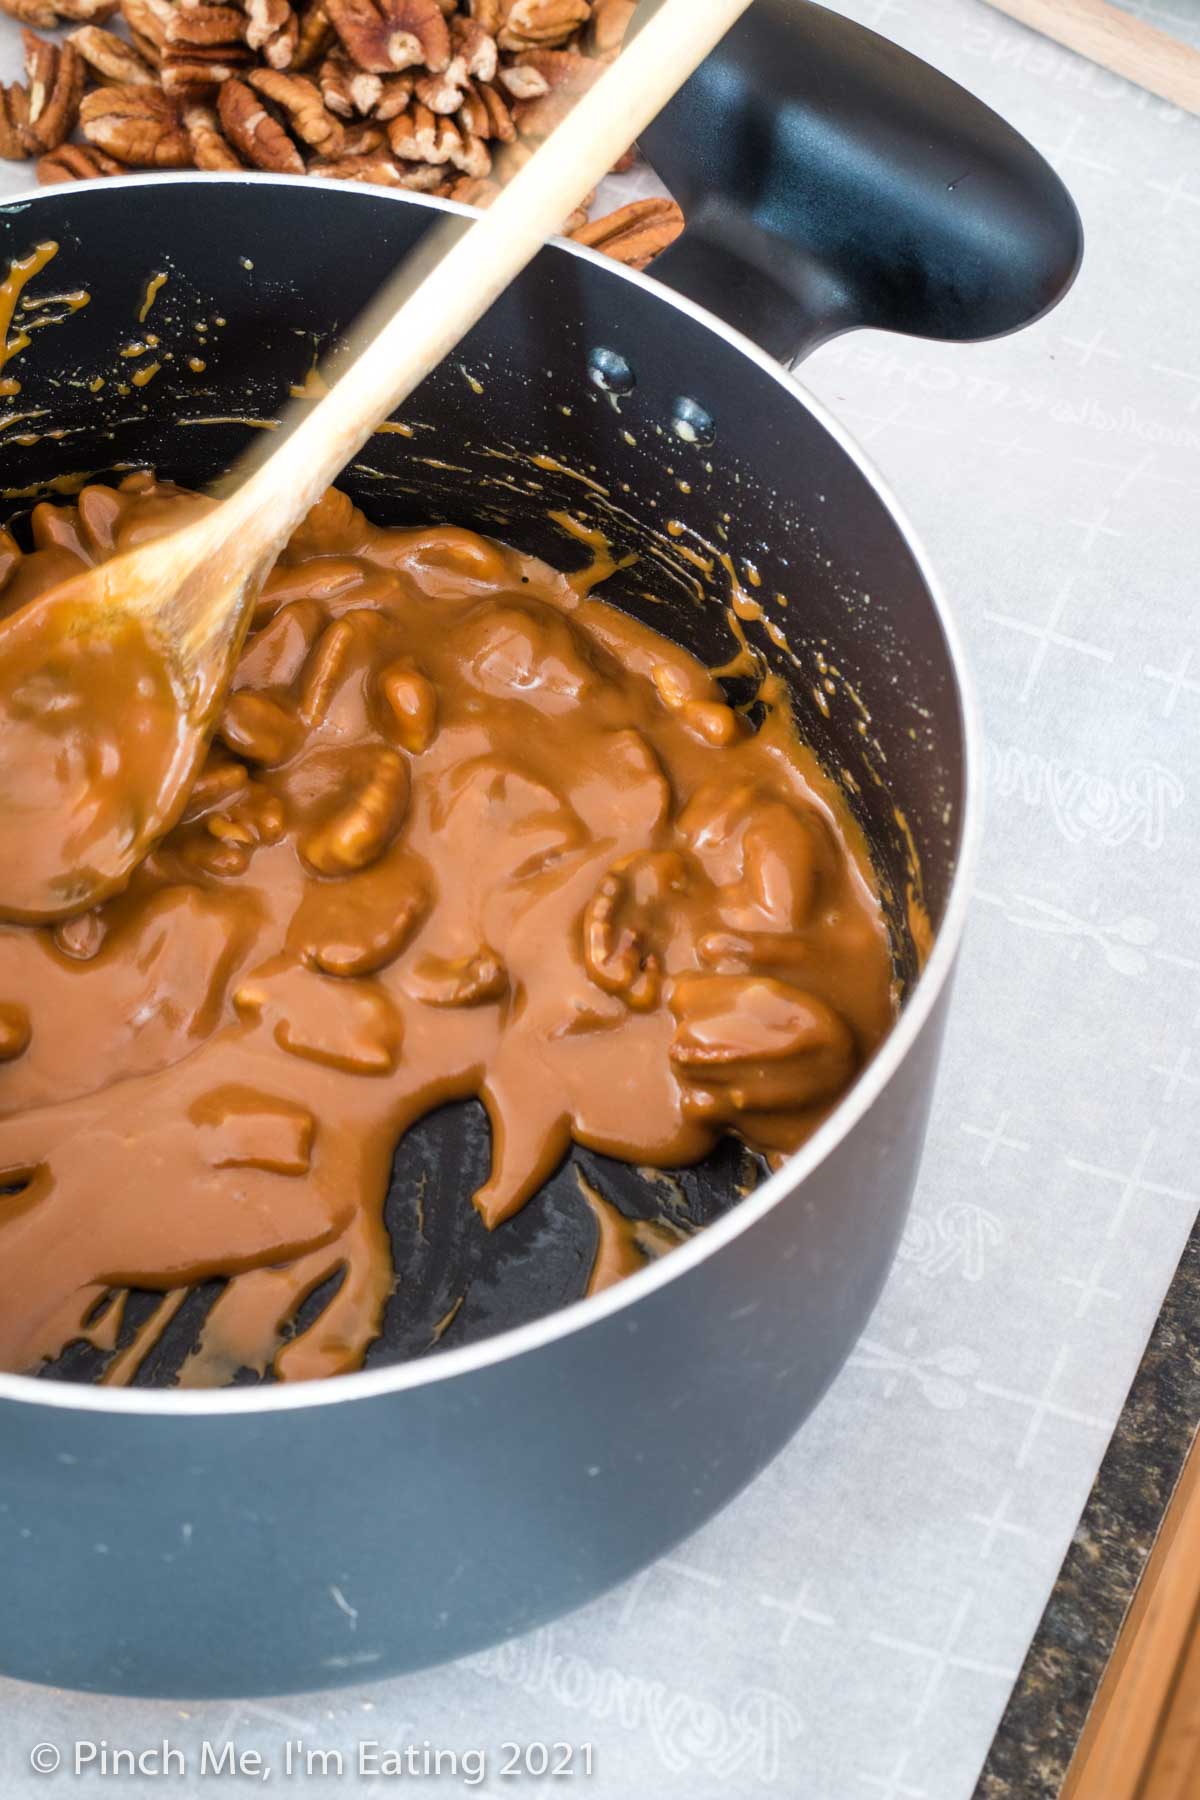
250 degrees (hard ball stage): As you stir, you’ll see a little more of the bottom of the pot, open bubbles, and the mixture will pull away from the side of the pot a little. The puffiness is mostly gone. The whole mixture sort of follows the spoon around as you stir. Pull the mixture off the heat at 250 degrees.
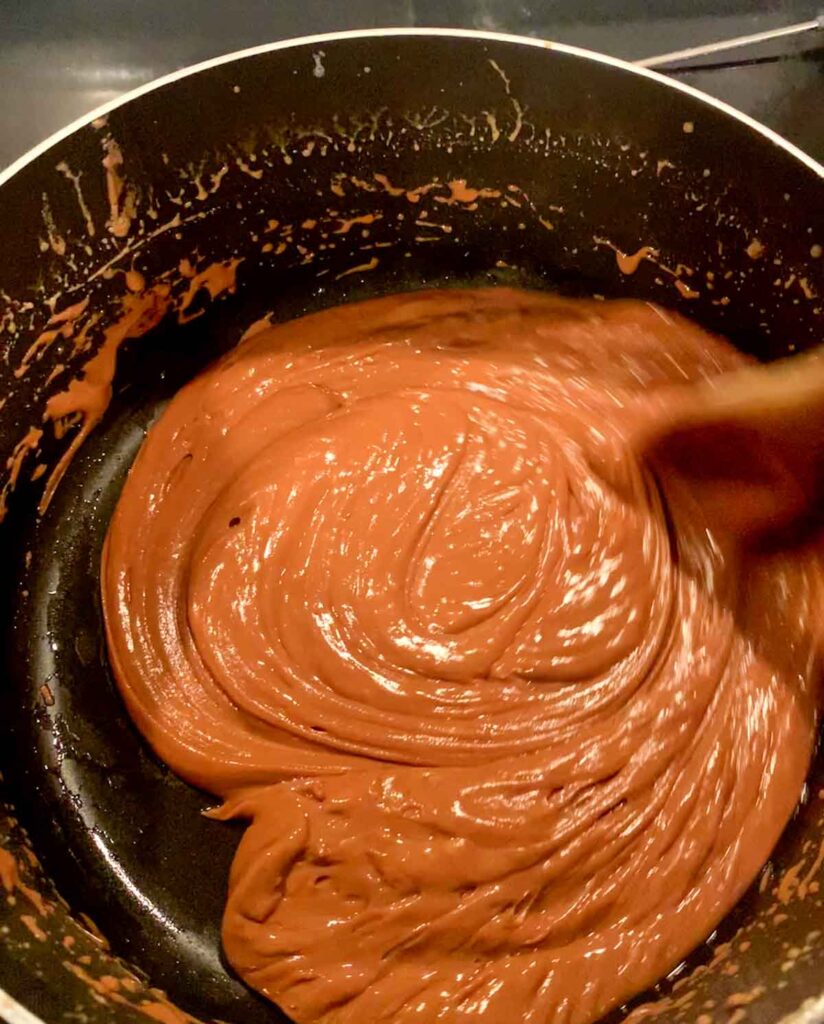
Over 260 degrees: (soft crack or hard crack stage): If the mixture becomes smooth, you no longer see bubbles, it looks more like caramel sauce, and the whole concoction pulls away from the side of the pot, you’ve overcooked it. It won’t make great pralines, but you can still make a delicious ice cream topping out of it.
It took my mixture about five and a half minutes to get from 215 to 250 degrees, so you have a good idea of how quickly this will progress. You may have to tell the other people in the room not to talk to you for a minute or two once you approach go-time.
Once you hit go-time (250 degrees) remove the mixture from heat, stir in your pecans, and give it about a minute to cool and thicken a bit. Let it cool too long, though, and it will get too thick to scoop. (Note: If using enameled cast iron, you may need to give it more than a minute to thicken since it retains heat for so long.)
Pralines cooling too fast?
If your praline mixture cools too much and starts to harden before you’ve finished scooping your pralines, add a tablespoon or two of water to help it thin back out just a little bit. Your final pralines may be a little softer but will still be beautiful and delicious!
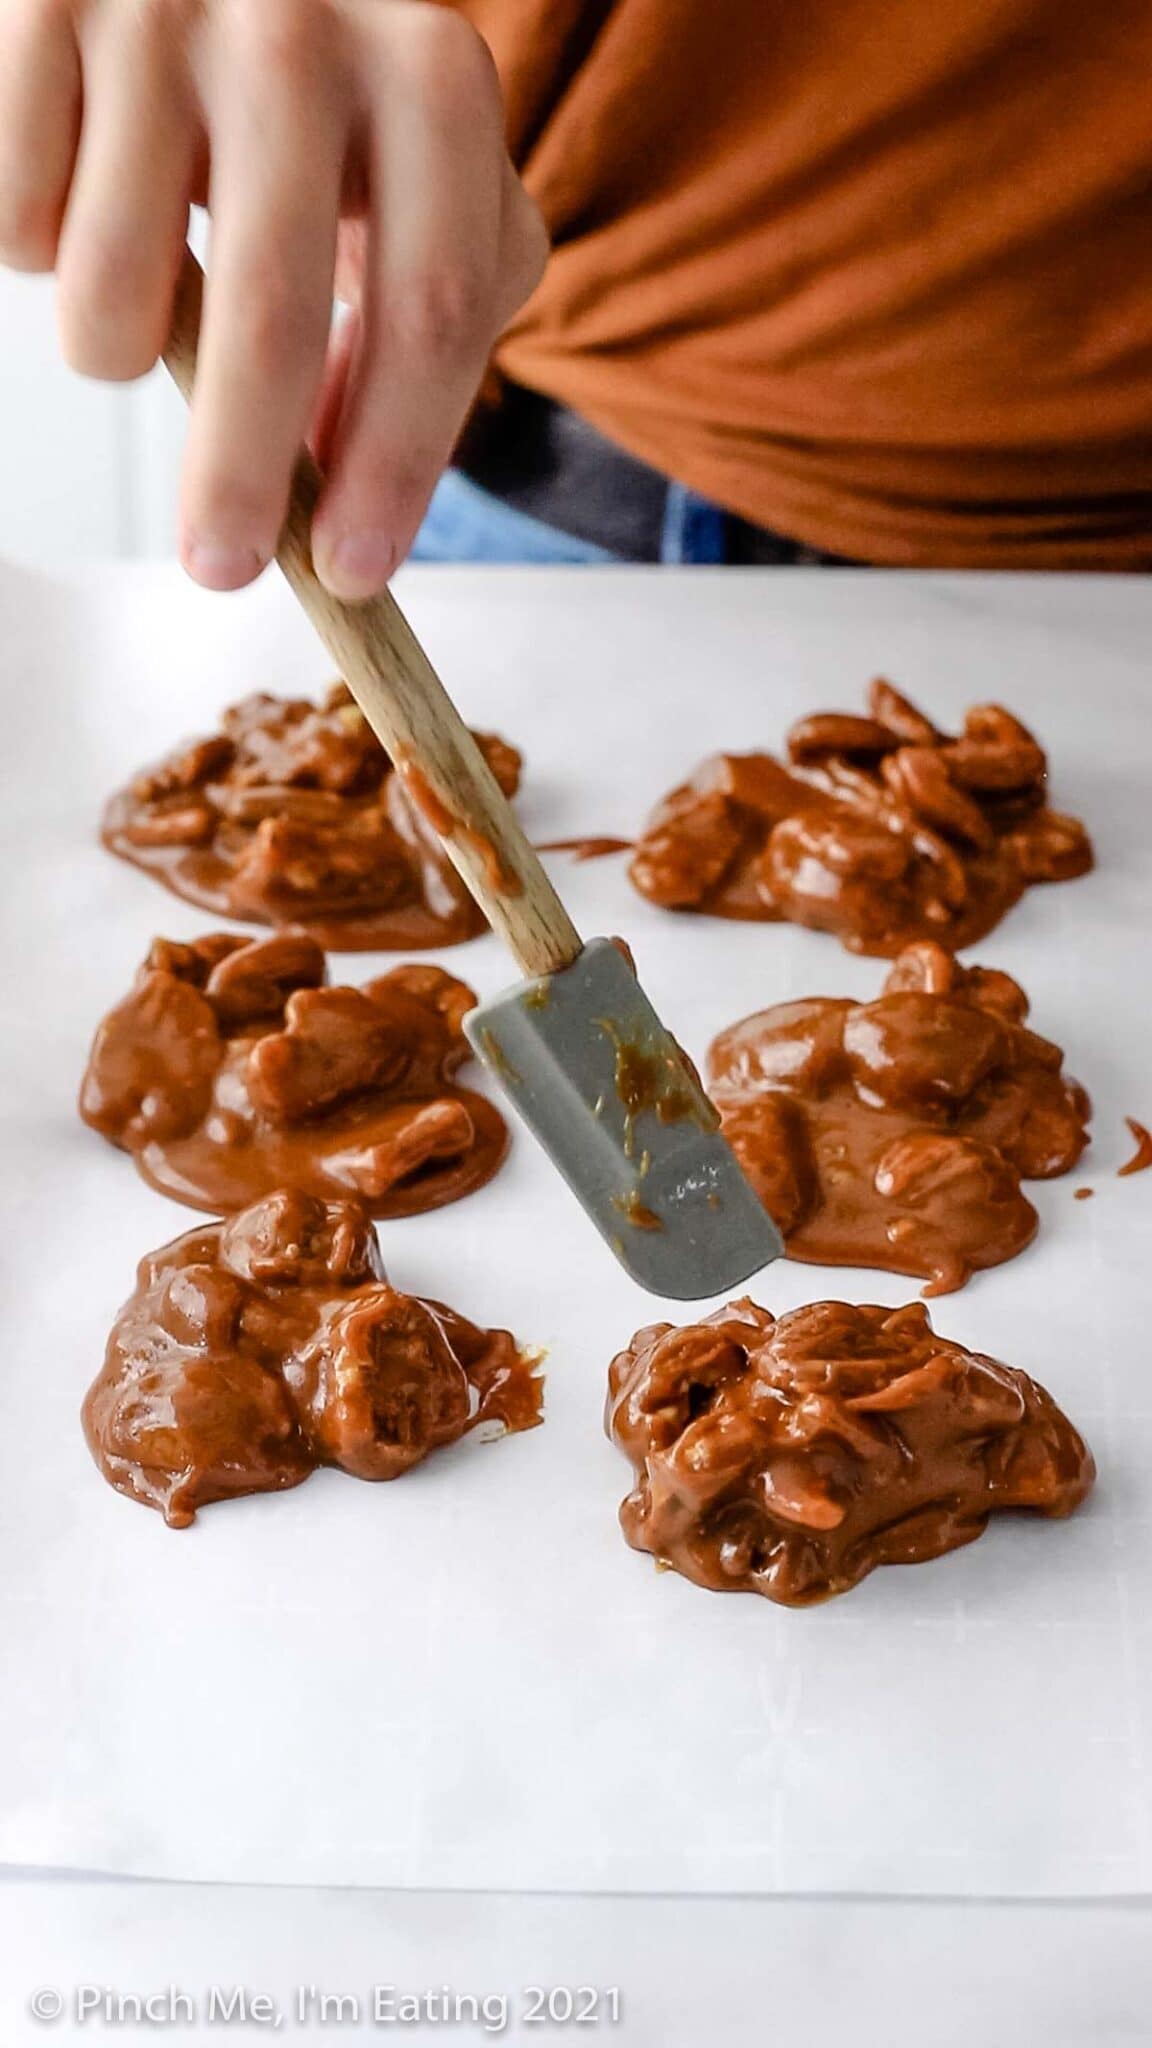
Once the pecans are evenly coated and the mixture thickens up a little, then use a quarter-cup measuring cup or 2-oz. cookie scoop to drop lumps of the mixture onto parchment paper.
Note: Pralines that have not been given adequate time to cool before scooping may be too thin. This results in a praline that looks like pecan halves poking out of a puddle of candy. If your candy puddles out like this, give the mixture another minute to cool and try again.
Let your pralines cool at room temperature for an hour or two, or until fully hardened.
Storing pralines
You can store pecan pralines at room temperature in an airtight container for at least a couple weeks. The surface will become less glossy as they age, with a more dull, almost powdery or crazed appearance, and that’s fine. They will still taste great.
Troubleshooting and FAQs
Please refer to the reference photo below for the troubleshooting questions if you want to see examples of the various “failed” or imperfect (but still delicious) pralines I made while testing.
The recipe video includes an example of a perfect praline and one that I pulled at 235 and stirred for six minutes.
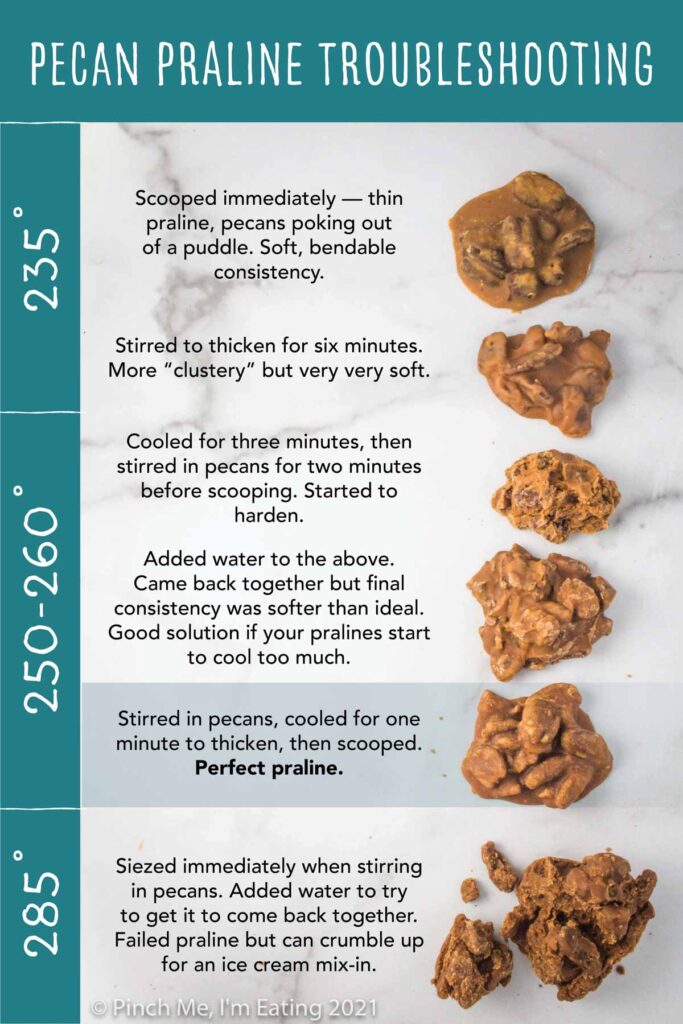
You either pulled your mixture too soon OR you didn’t let it cool at all after removing it from the heat. Give it another 5-10 degrees before you pull the mixture off the heat next time, or make sure you let it cool for about a minute after stirring in the pecans so it thickens up before scooping your pralines.
In the meantime, these will still be absolutely delicious. They may taste more buttery than usual.
See the top praline in the troubleshooting photo.
Quick, add a small amount of water (a tablespoon or two) to bring the mixture back together! This will either save your pralines completely (yay!), or make really decent and glossy pralines that are just a little softer than normal (still yay!). See the third and fourth pralines in the troubleshooting photo.
If you pulled the mixture so late that it was no longer bubbling while on the heat, see the question below.
You pulled the mixture too late/too hot. If your mixture stopped bubbling and became smooth like caramel before you removed it from the heat, it was probably 275 or 285 degrees by the time you took it off. There’s not much you can do to make them into pralines at that point; however, you can add a little water while mixing in your pecans and turn your pralines into a really delicious mess that you can use as a topping or mix-in for ice cream (still yay!).
See the last praline in the troubleshooting photo.
Your best bet is to make multiple batches.
First of all, you’d need a very large pot. The sugar mixture foams up and expands to wayyy bigger than you’d expect. My 5-qt pot was not large enough for a double batch, but an 8-qt or larger pot would probably be sufficient.
However, even with a large enough pot, the mixture starts to harden pretty quickly and you may not have enough time to scoop out all your pralines before it’s too thick.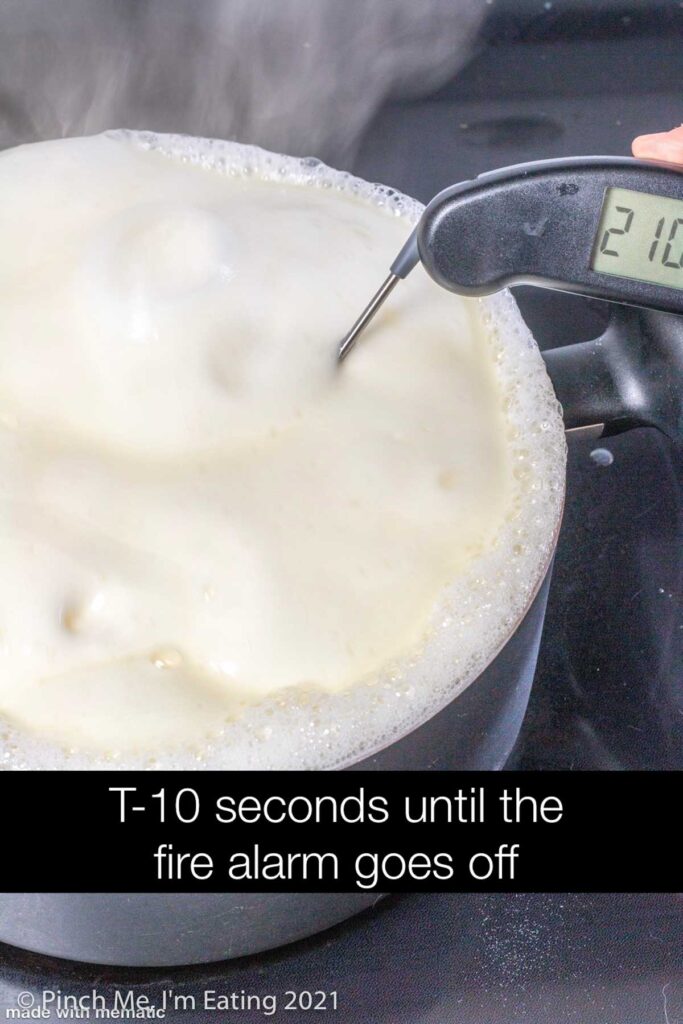
You sure can! I tested these so many times I had ALL KINDS of extras. I packed them up and sent them out in the mail to family and friends in cellophane treat bags inside cute little boxes. They loved the pralines and the packaging!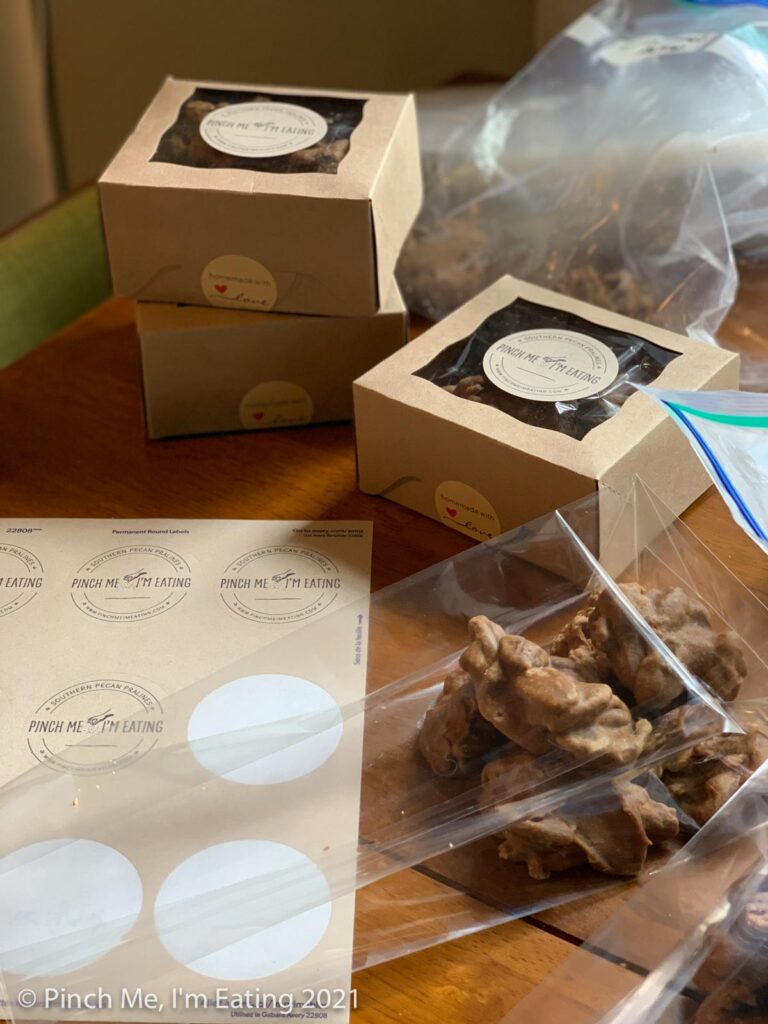
Here are the boxes, bags, and labels I used — each box fit 6-8 pralines inside.
Cellophane treat bags (I took out the cardboard insert so it fit inside the boxes)
Bakery boxes
Printable labels for the box tops
“Handmade with love” stickers
Corrugated shipping boxes (just large enough to hold the bakery boxes linked above, with a tiny bit of padding by some crumbled paper)
There’s a huge difference between Southern pecan pralines and praline pecans. Pecan pralines are cookie-sized pecan clusters bound together by a fudgy candy mixture with a caramel-like flavor. Praline pecans, on the other hand, are individual pecans coated with a crunchy sugar-and-spice coating. Praline pecans are made by coating pecans in beaten egg white and a spiced sugar mixture, and then baked until crisp.
More sweet treats to make
If you like making Southern pecan pralines, you’ll love these other recipes too!
Be sure to FOLLOW ME on FACEBOOK, PINTEREST, INSTAGRAM, and TWITTER for more great recipe ideas! Or SIGN UP for my EMAIL NEWSLETTER to get updates and recipes straight to your inbox!
Southern Pecan Pralines (Traditional Praline Recipe)
Equipment
- 5 qt or larger pot
- Wooden spoon
- 1/4 cup measuring cup or cookie scoop
- Parchment paper
- Small spatula
Ingredients
- 1 1/4 cups granulated sugar
- 1 cup half-and-half
- 1/2 cup butter
- 3/4 tsp baking soda
- 1 1/2 cups pecan halves
Instructions
- Before you begin, lay out your parchment paper, 1/4-cup measuring cup or cookie scoop, and small spatula, and measure out your pecans. You need to be able to move quickly once you take your candy off the heat and can't waste any time looking for tools or measuring ingredients once it starts to cool.
- Add sugar, half-and-half, butter, and baking soda to a large pot (5 qts or more). Stir ingredients to combine and heat over medium high heat.
- Heat, stirring frequently, until mixture reaches 250 degrees Fahrenheit. If you do not have an instant-read thermometer or candy thermometer, please watch the recipe video and refer to the photos above or in the recipe notes for a visual of what to look for so you know it's the right temperature.
- When the mixture reaches 250 degrees, remove from heat and stir in the pecans. Let the mixture cool for one minute so it can thicken a little before you scoop out your pralines.
- Drop pralines onto the parchment paper by 1/4-cup scoops (or using a cookie scoop), giving just a little space between. If mixture starts to cool and harden too much before you finish scooping, you can add a tablespoon or two of water to thin out the praline mixture again.
- Allow to cool at room temperature for an hour or two, or until pralines are hard. Pralines should have a glossy sheen to them and break cleanly with sort of a snap (not audible) rather than bending like a soft cookie. (They're not crunchy either, besides the natural crunch of the pecans)
- Store in an airtight container at room temperature for up to two weeks. Pralines made correctly will become less glossy with time.
Notes
This mixture is 250 degrees. The puffiness is gone and there are open bubbles across the top. When your mixture looks like this, remove it from the heat and stir in your pecans.


I agree about the mixture of brown and white sugar. Also, no vanilla? How much trouble would it be to dump a mere spoonful of vanilla in there?
1st time I’ve ever made pralines, they came out perfect! I have some experience making candy, but the pictures of what the mixture looked like at the different temperatures really helped. My husband is diabetic so I only kept a few at home and gave the rest to my sister and her family. They have never had pralines before and absolutely loved them. Thank you for such a wonderful recipe!!!
First time making Pralines and SUCCESS!! My candy thermometer was not helpful either, so your video was terrific🤩🤩 When I saw the color darken and the difference in the bubbles/texture, I knew it was READY!! After adding pecans and dropping mixture onto the parchment, I did have to act FAST so I wonder if spreading on parchment and breaking up after setting would work? My recipe, same quantities and ingredients, served 30 pralines and I only ended with about 16. But the are BEAUTIFUL and YUMMY….THANK YOU!!
Tried the recipe twice, exactly as the instructions stated. Not once did the mixture ever make it to 250 degrees. The first time I left off the thermometer and went by the picture. It didn’t set. The second time I left the thermometer in,and it only got up to 239 and it burned up and scorched my pan. No thanks. Won’t try this again.
Sounds as if you either had your heat to high, were not stirring the entire time, or have a bad thermometer.
Best explanation I’ve found on the internet! Thanks!
This is an excellent tutorial with detailed and step-by-step photos. I could almost smell the inside of River Street Sweets in Savannah from memory!
Thanks so much for sharing! Glad they could bring back a good memory for you!
i think the author forgot to put equal parts white to brown sugar in the recipe & skip the baking soda. also, evaporated milk works better in recipes like this (high heat and longer cooking times)